Difference between revisions of "Portal:New Genesis/Collectables"
Jump to navigation
Jump to search
| Line 24: | Line 24: | ||
{| class="wikitable sortable table-bordered table-responsive-md" | {| class="wikitable sortable table-bordered table-responsive-md" | ||
!Red Container (#) | !Red Container (#) | ||
| − | |||
!Rewards | !Rewards | ||
|- | |- | ||
|align=center|(1) | |align=center|(1) | ||
| − | |||
|{{icons|NMeseta}} 10,000 | |{{icons|NMeseta}} 10,000 | ||
|- | |- | ||
|align=center|(2) | |align=center|(2) | ||
| − | |||
|{{icons|SG}} 10 | |{{icons|SG}} 10 | ||
|- | |- | ||
|align=center|(3) | |align=center|(3) | ||
| − | |||
|{{icons|NMeseta}} 10,000 | |{{icons|NMeseta}} 10,000 | ||
|- | |- | ||
|align=center|(4) | |align=center|(4) | ||
| − | |||
|{{icons|SG}} 10 | |{{icons|SG}} 10 | ||
|- | |- | ||
|align=center|(5) | |align=center|(5) | ||
| − | |||
|{{icons|NMeseta}} 10,000 | |{{icons|NMeseta}} 10,000 | ||
|- | |- | ||
|align=center|(6) | |align=center|(6) | ||
| − | |||
|{{icons|NGS Ability Capsule}} Ael Note A x10 | |{{icons|NGS Ability Capsule}} Ael Note A x10 | ||
|- | |- | ||
|align=center|(7) | |align=center|(7) | ||
| − | |||
|{{icons|SG}} 10 | |{{icons|SG}} 10 | ||
|- | |- | ||
|align=center|(8) | |align=center|(8) | ||
| − | |||
|{{icons|SG}} 10 | |{{icons|SG}} 10 | ||
|- | |- | ||
|align=center|(9) | |align=center|(9) | ||
| − | |||
|{{icons|NMeseta}} 10,000 | |{{icons|NMeseta}} 10,000 | ||
|- | |- | ||
|align=center|(10) | |align=center|(10) | ||
| − | |||
|{{icons|SG}} 10 | |{{icons|SG}} 10 | ||
|- | |- | ||
|align=center|(11) | |align=center|(11) | ||
| − | |||
|{{icons|NMeseta}} 10,000 | |{{icons|NMeseta}} 10,000 | ||
|- | |- | ||
|align=center|(12) | |align=center|(12) | ||
| − | |||
|{{icons|NMeseta}} 10,000 | |{{icons|NMeseta}} 10,000 | ||
|- | |- | ||
|align=center|(13) | |align=center|(13) | ||
| − | |||
|{{icons|SG}} 10 | |{{icons|SG}} 10 | ||
|- | |- | ||
|align=center|(14) | |align=center|(14) | ||
| − | |||
|{{icons|NMeseta}} 10,000 | |{{icons|NMeseta}} 10,000 | ||
|- | |- | ||
|align=center|(15) | |align=center|(15) | ||
| − | |||
|{{icons|SG}} 10 | |{{icons|SG}} 10 | ||
|- | |- | ||
|align=center|(16) | |align=center|(16) | ||
| − | |||
|{{icons|NMeseta}} 10,000 | |{{icons|NMeseta}} 10,000 | ||
|- | |- | ||
|align=center|(17) | |align=center|(17) | ||
| − | |||
|{{icons|SG}} 10 | |{{icons|SG}} 10 | ||
|- | |- | ||
|align=center|(18) | |align=center|(18) | ||
| − | |||
|{{icons|NGS Unit}} [[Qual De Armor Arga|Qual De Armor: Arga]] | |{{icons|NGS Unit}} [[Qual De Armor Arga|Qual De Armor: Arga]] | ||
|- | |- | ||
|align=center|(19) | |align=center|(19) | ||
| − | |||
|{{icons|NMeseta}} 10,000 | |{{icons|NMeseta}} 10,000 | ||
|- | |- | ||
|align=center|(20) | |align=center|(20) | ||
| − | |||
|{{icons|SG}} 10 | |{{icons|SG}} 10 | ||
|- | |- | ||
|align=center|(21) | |align=center|(21) | ||
| − | |||
|{{icons|SG}} 10 | |{{icons|SG}} 10 | ||
|- | |- | ||
|align=center|(22) | |align=center|(22) | ||
| − | |||
|{{icons|NMeseta}} 10,000 | |{{icons|NMeseta}} 10,000 | ||
|- | |- | ||
|align=center|(23) | |align=center|(23) | ||
| − | |||
|{{icons|NMeseta}} 10,000 | |{{icons|NMeseta}} 10,000 | ||
|- | |- | ||
|align=center|(24) | |align=center|(24) | ||
| − | |||
|{{icons|NMeseta}} 10,000 | |{{icons|NMeseta}} 10,000 | ||
|- | |- | ||
| Line 137: | Line 112: | ||
{| class="wikitable sortable table-bordered table-responsive-md" | {| class="wikitable sortable table-bordered table-responsive-md" | ||
!Red Container (#) | !Red Container (#) | ||
| − | |||
!Rewards | !Rewards | ||
|- | |- | ||
|align=center|(1) | |align=center|(1) | ||
| − | |||
|{{icons|NMeseta}} 10,000 | |{{icons|NMeseta}} 10,000 | ||
|- | |- | ||
|align=center|(2) | |align=center|(2) | ||
| − | |||
|{{icons|SG}} 10 | |{{icons|SG}} 10 | ||
|- | |- | ||
|align=center|(3) | |align=center|(3) | ||
| − | |||
|{{icons|NMeseta}} 10,000 | |{{icons|NMeseta}} 10,000 | ||
|- | |- | ||
|align=center|(4) | |align=center|(4) | ||
| − | |||
|{{icons|SG}} 10 | |{{icons|SG}} 10 | ||
|- | |- | ||
|align=center|(5) | |align=center|(5) | ||
| − | |||
|{{icons|SG}} 10 | |{{icons|SG}} 10 | ||
|- | |- | ||
|align=center|(6) | |align=center|(6) | ||
| − | |||
|{{icons|SG}} 10 | |{{icons|SG}} 10 | ||
|- | |- | ||
|align=center|(7) | |align=center|(7) | ||
| − | |||
|{{icons|NMeseta}} 10,000 | |{{icons|NMeseta}} 10,000 | ||
|- | |- | ||
|align=center|(8) | |align=center|(8) | ||
| − | |||
|{{icons|NMeseta}} 10,000 | |{{icons|NMeseta}} 10,000 | ||
|- | |- | ||
|align=center|(9) | |align=center|(9) | ||
| − | |||
|{{icons|NMeseta}} 10,000 | |{{icons|NMeseta}} 10,000 | ||
|- | |- | ||
|align=center|(10) | |align=center|(10) | ||
| − | |||
|{{icons|NMeseta}} 10,000 | |{{icons|NMeseta}} 10,000 | ||
|- | |- | ||
|align=center|(11) | |align=center|(11) | ||
| − | |||
|{{icons|NGS Ability Capsule}} Ael Note C x10 | |{{icons|NGS Ability Capsule}} Ael Note C x10 | ||
|- | |- | ||
|align=center|(12) | |align=center|(12) | ||
| − | |||
|{{icons|NMeseta}} 10,000 | |{{icons|NMeseta}} 10,000 | ||
|- | |- | ||
|align=center|(13) | |align=center|(13) | ||
| − | |||
|{{icons|NMeseta}} 10,000 | |{{icons|NMeseta}} 10,000 | ||
|- | |- | ||
|align=center|(14) | |align=center|(14) | ||
| − | |||
|{{icons|SG}} 10 | |{{icons|SG}} 10 | ||
|- | |- | ||
|align=center|(15) | |align=center|(15) | ||
| − | |||
|{{icons|SG}} 10 | |{{icons|SG}} 10 | ||
|- | |- | ||
|align=center|(16) | |align=center|(16) | ||
| − | |||
|{{icons|SG}} 10 | |{{icons|SG}} 10 | ||
|- | |- | ||
|align=center|(17) | |align=center|(17) | ||
| − | |||
|{{icons|SG}} 10 | |{{icons|SG}} 10 | ||
|- | |- | ||
|align=center|(18) | |align=center|(18) | ||
| − | |||
|{{icons|NMeseta}} 25,000 | |{{icons|NMeseta}} 25,000 | ||
|- | |- | ||
| Line 226: | Line 182: | ||
{| class="wikitable sortable table-bordered table-responsive-md" | {| class="wikitable sortable table-bordered table-responsive-md" | ||
!Red Container (#) | !Red Container (#) | ||
| − | |||
!Rewards | !Rewards | ||
|- | |- | ||
|align=center|(1) | |align=center|(1) | ||
| − | |||
|{{icons|SG}} 10 | |{{icons|SG}} 10 | ||
|- | |- | ||
|align=center|(2) | |align=center|(2) | ||
| − | |||
|{{icons|NMeseta}} 10,000 | |{{icons|NMeseta}} 10,000 | ||
|- | |- | ||
|align=center|(3) | |align=center|(3) | ||
| − | |||
|{{icons|NMeseta}} 10,000 | |{{icons|NMeseta}} 10,000 | ||
|- | |- | ||
|align=center|(4) | |align=center|(4) | ||
| − | |||
|{{icons|NMeseta}} 10,000 | |{{icons|NMeseta}} 10,000 | ||
|- | |- | ||
|align=center|(5) | |align=center|(5) | ||
| − | |||
|{{icons|NMeseta}} 10,000 | |{{icons|NMeseta}} 10,000 | ||
|- | |- | ||
|align=center|(6) | |align=center|(6) | ||
| − | |||
|{{icons|NMeseta}} 10,000 | |{{icons|NMeseta}} 10,000 | ||
|- | |- | ||
|align=center|(7) | |align=center|(7) | ||
| − | |||
|{{icons|NGS Unit}} [[Qual De Armor Belta|Qual De Armor: Belta]] | |{{icons|NGS Unit}} [[Qual De Armor Belta|Qual De Armor: Belta]] | ||
|- | |- | ||
|align=center|(8) | |align=center|(8) | ||
| − | |||
|{{icons|SG}} 10 | |{{icons|SG}} 10 | ||
|- | |- | ||
|align=center|(9) | |align=center|(9) | ||
| − | |||
|{{icons|NMeseta}} 10,000 | |{{icons|NMeseta}} 10,000 | ||
|- | |- | ||
|align=center|(10) | |align=center|(10) | ||
| − | |||
|{{icons|SG}} 10 | |{{icons|SG}} 10 | ||
|- | |- | ||
|align=center|(11) | |align=center|(11) | ||
| − | |||
|{{icons|SG}} 10 | |{{icons|SG}} 10 | ||
|- | |- | ||
|align=center|(12) | |align=center|(12) | ||
| − | |||
|{{icons|SG}} 10 | |{{icons|SG}} 10 | ||
|- | |- | ||
|align=center|(13) | |align=center|(13) | ||
| − | |||
|{{icons|SG}} 10 | |{{icons|SG}} 10 | ||
|- | |- | ||
|align=center|(14) | |align=center|(14) | ||
| − | |||
|{{icons|NMeseta}} 10,000 | |{{icons|NMeseta}} 10,000 | ||
|- | |- | ||
|align=center|(15) | |align=center|(15) | ||
| − | |||
|{{icons|NGS Ability Capsule}} Ael Note B x10 | |{{icons|NGS Ability Capsule}} Ael Note B x10 | ||
|- | |- | ||
|align=center|(16) | |align=center|(16) | ||
| − | |||
|{{icons|SG}} 10 | |{{icons|SG}} 10 | ||
|- | |- | ||
|align=center|(17) | |align=center|(17) | ||
| − | |||
|{{icons|SG}} 10 | |{{icons|SG}} 10 | ||
|- | |- | ||
|align=center|(18) | |align=center|(18) | ||
| − | |||
|{{icons|NMeseta}} 10,000 | |{{icons|NMeseta}} 10,000 | ||
|- | |- | ||
| Line 315: | Line 252: | ||
{| class="wikitable sortable table-bordered table-responsive-md" | {| class="wikitable sortable table-bordered table-responsive-md" | ||
!Red Container (#) | !Red Container (#) | ||
| − | |||
!Rewards | !Rewards | ||
|- | |- | ||
|align=center|(1) | |align=center|(1) | ||
| − | |||
|{{icons|NMeseta}} 10,000 | |{{icons|NMeseta}} 10,000 | ||
|- | |- | ||
|align=center|(2) | |align=center|(2) | ||
| − | |||
|{{icons|SG}} 10 | |{{icons|SG}} 10 | ||
|- | |- | ||
|align=center|(3) | |align=center|(3) | ||
| − | |||
|{{icons|NMeseta}} 10,000 | |{{icons|NMeseta}} 10,000 | ||
|- | |- | ||
|align=center|(4) | |align=center|(4) | ||
| − | |||
|{{icons|SG}} 10 | |{{icons|SG}} 10 | ||
|- | |- | ||
|align=center|(5) | |align=center|(5) | ||
| − | |||
|{{icons|NMeseta}} 10,000 | |{{icons|NMeseta}} 10,000 | ||
|- | |- | ||
|align=center|(6) | |align=center|(6) | ||
| − | |||
|{{icons|SG}} 10 | |{{icons|SG}} 10 | ||
|- | |- | ||
|align=center|(7) | |align=center|(7) | ||
| − | |||
|{{icons|NMeseta}} 10,000 | |{{icons|NMeseta}} 10,000 | ||
|- | |- | ||
|align=center|(8) | |align=center|(8) | ||
| − | |||
|{{icons|NGS Unit}} [[Qual De Armor Sheza|Qual De Armor: Sheza]] | |{{icons|NGS Unit}} [[Qual De Armor Sheza|Qual De Armor: Sheza]] | ||
|- | |- | ||
|align=center|(9) | |align=center|(9) | ||
| − | |||
|{{icons|SG}} 10 | |{{icons|SG}} 10 | ||
|- | |- | ||
|align=center|(10) | |align=center|(10) | ||
| − | |||
|{{icons|NMeseta}} 10,000 | |{{icons|NMeseta}} 10,000 | ||
|- | |- | ||
|align=center|(11) | |align=center|(11) | ||
| − | |||
|{{icons|NMeseta}} 10,000 | |{{icons|NMeseta}} 10,000 | ||
|- | |- | ||
|align=center|(12) | |align=center|(12) | ||
| − | |||
|{{icons|NGS Ability Capsule}} Ael Note D x10 | |{{icons|NGS Ability Capsule}} Ael Note D x10 | ||
|- | |- | ||
|align=center|(13) | |align=center|(13) | ||
| − | |||
|{{icons|SG}} 10 | |{{icons|SG}} 10 | ||
|- | |- | ||
|align=center|(14) | |align=center|(14) | ||
| − | |||
|{{icons|SG}} 10 | |{{icons|SG}} 10 | ||
|- | |- | ||
|align=center|(15) | |align=center|(15) | ||
| − | |||
|{{icons|NMeseta}} 10,000 | |{{icons|NMeseta}} 10,000 | ||
|- | |- | ||
| Line 392: | Line 313: | ||
{| class="wikitable sortable table-bordered table-responsive-md" | {| class="wikitable sortable table-bordered table-responsive-md" | ||
!Red Container (#) | !Red Container (#) | ||
| − | |||
!Rewards | !Rewards | ||
|- | |- | ||
|align=center|(1) | |align=center|(1) | ||
| − | |||
|{{icons|NMeseta}} 10,000 | |{{icons|NMeseta}} 10,000 | ||
|- | |- | ||
|align=center|(2) | |align=center|(2) | ||
| − | |||
|{{icons|NMeseta}} 25,000 | |{{icons|NMeseta}} 25,000 | ||
|- | |- | ||
|align=center|(3) | |align=center|(3) | ||
| − | |||
|{{icons|SG}} 10 | |{{icons|SG}} 10 | ||
|- | |- | ||
|align=center|(4) | |align=center|(4) | ||
| − | |||
|{{icons|NMeseta}} 10,000 | |{{icons|NMeseta}} 10,000 | ||
|- | |- | ||
|align=center|(5) | |align=center|(5) | ||
| − | |||
|{{icons|SG}} 10 | |{{icons|SG}} 10 | ||
|- | |- | ||
|align=center|(6) | |align=center|(6) | ||
| − | |||
|{{icons|NMeseta}} 10,000 | |{{icons|NMeseta}} 10,000 | ||
|- | |- | ||
|align=center|(7) | |align=center|(7) | ||
| − | |||
|{{icons|SG}} 10 | |{{icons|SG}} 10 | ||
|- | |- | ||
|align=center|(8) | |align=center|(8) | ||
| − | |||
|{{icons|SG}} 10 | |{{icons|SG}} 10 | ||
|- | |- | ||
|align=center|(9) | |align=center|(9) | ||
| − | |||
|{{icons|NMeseta}} 10,000 | |{{icons|NMeseta}} 10,000 | ||
|- | |- | ||
| Line 445: | Line 356: | ||
{| class="wikitable sortable table-bordered table-responsive-md" | {| class="wikitable sortable table-bordered table-responsive-md" | ||
!Red Container (#) | !Red Container (#) | ||
| − | |||
!Rewards | !Rewards | ||
|- | |- | ||
|align=center|(1) | |align=center|(1) | ||
| − | |||
|{{icons|NMeseta}} 10,000 | |{{icons|NMeseta}} 10,000 | ||
|- | |- | ||
|align=center|(2) | |align=center|(2) | ||
| − | |||
|{{icons|SG}} 10 | |{{icons|SG}} 10 | ||
|- | |- | ||
|align=center|(3) | |align=center|(3) | ||
| − | |||
|{{icons|NMeseta}} 10,000 | |{{icons|NMeseta}} 10,000 | ||
|- | |- | ||
|align=center|(4) | |align=center|(4) | ||
| − | |||
|{{icons|SG}} 10 | |{{icons|SG}} 10 | ||
|- | |- | ||
|align=center|(5) | |align=center|(5) | ||
| − | |||
|{{icons|NMeseta}} 10,000 | |{{icons|NMeseta}} 10,000 | ||
|- | |- | ||
|align=center|(6) | |align=center|(6) | ||
| − | |||
|{{icons|NMeseta}} 10,000 | |{{icons|NMeseta}} 10,000 | ||
|- | |- | ||
|align=center|(7) | |align=center|(7) | ||
| − | |||
|{{icons|SG}} 10 | |{{icons|SG}} 10 | ||
|- | |- | ||
|align=center|(8) | |align=center|(8) | ||
| − | |||
|{{icons|SG}} 10 | |{{icons|SG}} 10 | ||
|- | |- | ||
|align=center|(9) | |align=center|(9) | ||
| − | |||
|{{icons|NMeseta}} 10,000 | |{{icons|NMeseta}} 10,000 | ||
|- | |- | ||
|align=center|(10) | |align=center|(10) | ||
| − | |||
|{{icons|NMeseta}} 10,000 | |{{icons|NMeseta}} 10,000 | ||
|- | |- | ||
|align=center|(11) | |align=center|(11) | ||
| − | |||
|{{icons|SG}} 10 | |{{icons|SG}} 10 | ||
|- | |- | ||
|align=center|(12) | |align=center|(12) | ||
| − | |||
|{{icons|NMeseta}} 10,000 | |{{icons|NMeseta}} 10,000 | ||
|- | |- | ||
|align=center|(13) | |align=center|(13) | ||
| − | |||
|{{icons|SG}} 10 | |{{icons|SG}} 10 | ||
|- | |- | ||
| Line 514: | Line 411: | ||
{| class="wikitable sortable table-bordered table-responsive-md" | {| class="wikitable sortable table-bordered table-responsive-md" | ||
!Red Container (#) | !Red Container (#) | ||
| − | |||
!Rewards | !Rewards | ||
|- | |- | ||
|align=center|(1) | |align=center|(1) | ||
| − | |||
|{{icons|NMeseta}} 10,000 | |{{icons|NMeseta}} 10,000 | ||
|- | |- | ||
|align=center|(2) | |align=center|(2) | ||
| − | |||
|{{icons|SG}} 10 | |{{icons|SG}} 10 | ||
|- | |- | ||
|align=center|(3) | |align=center|(3) | ||
| − | |||
|{{icons|NMeseta}} 10,000 | |{{icons|NMeseta}} 10,000 | ||
|- | |- | ||
|align=center|(4) | |align=center|(4) | ||
| − | |||
|{{icons|SG}} 10 | |{{icons|SG}} 10 | ||
|- | |- | ||
|align=center|(5) | |align=center|(5) | ||
| − | |||
|{{icons|SG}} 10 | |{{icons|SG}} 10 | ||
|- | |- | ||
|align=center|(6) | |align=center|(6) | ||
| − | |||
|{{icons|SG}} 10 | |{{icons|SG}} 10 | ||
|- | |- | ||
|align=center|(7) | |align=center|(7) | ||
| − | |||
|{{icons|NMeseta}} 10,000 | |{{icons|NMeseta}} 10,000 | ||
|- | |- | ||
|align=center|(8) | |align=center|(8) | ||
| − | |||
|{{icons|NMeseta}} 10,000 | |{{icons|NMeseta}} 10,000 | ||
|- | |- | ||
| Line 563: | Line 451: | ||
{| class="wikitable sortable table-bordered table-responsive-md" | {| class="wikitable sortable table-bordered table-responsive-md" | ||
!Red Container (#) | !Red Container (#) | ||
| − | |||
!Rewards | !Rewards | ||
|- | |- | ||
|align=center|(1) | |align=center|(1) | ||
| − | |||
|{{icons|SG}} 10 | |{{icons|SG}} 10 | ||
|- | |- | ||
|align=center|(2) | |align=center|(2) | ||
| − | |||
|{{icons|NMeseta}} 10,000 | |{{icons|NMeseta}} 10,000 | ||
|- | |- | ||
|align=center|(3) | |align=center|(3) | ||
| − | |||
|{{icons|NMeseta}} 10,000 | |{{icons|NMeseta}} 10,000 | ||
|- | |- | ||
|align=center|(4) | |align=center|(4) | ||
| − | |||
|{{icons|SG}} 10 | |{{icons|SG}} 10 | ||
|- | |- | ||
|align=center|(5) | |align=center|(5) | ||
| − | |||
|{{icons|SG}} 10 | |{{icons|SG}} 10 | ||
|- | |- | ||
|align=center|(6) | |align=center|(6) | ||
| − | |||
|{{icons|NMeseta}} 10,000 | |{{icons|NMeseta}} 10,000 | ||
|- | |- | ||
|align=center|(7) | |align=center|(7) | ||
| − | |||
|{{icons|SG}} 10 | |{{icons|SG}} 10 | ||
|- | |- | ||
|align=center|(8) | |align=center|(8) | ||
| − | |||
|{{icons|NMeseta}} 10,000 | |{{icons|NMeseta}} 10,000 | ||
|- | |- | ||
| Line 618: | Line 497: | ||
|} | |} | ||
| − | == | + | ===Datapod Information (Aelio Region)=== |
| − | |||
| − | |||
| − | |||
| − | |||
| − | |||
| − | |||
| − | |||
| − | |||
| − | |||
| − | |||
Please refer to the collapsed image as a reference for the following table: | Please refer to the collapsed image as a reference for the following table: | ||
| Line 640: | Line 509: | ||
|There are various colors of Item Containers. You'll definitely find some great stuff in the Gold ones. | |There are various colors of Item Containers. You'll definitely find some great stuff in the Gold ones. | ||
| | | | ||
| − | |Central Aelio | + | |Central Aelio |
|- | |- | ||
|align=center|(2) | |align=center|(2) | ||
|This area is a cornucopia of fruits and vegetables. It's a great spot for ingredient hunters. | |This area is a cornucopia of fruits and vegetables. It's a great spot for ingredient hunters. | ||
| | | | ||
| − | |Central Aelio | + | |Central Aelio |
|- | |- | ||
|align=center|(3) | |align=center|(3) | ||
|You may be able to find abandoned Item Containers near the cliffs of Central Aelio. | |You may be able to find abandoned Item Containers near the cliffs of Central Aelio. | ||
| | | | ||
| − | |Central Aelio | + | |Central Aelio |
|- | |- | ||
|align=center|(4) | |align=center|(4) | ||
| + | | | ||
| + | | | ||
| + | |Central Aelio | ||
| + | |- | ||
| + | |align=center|(5) | ||
|The wide plains of Central Aelio are spotted with gently sloping hills. Many TAMES inhabit these lands. | |The wide plains of Central Aelio are spotted with gently sloping hills. Many TAMES inhabit these lands. | ||
| | | | ||
| − | |Central Aelio | + | |Central Aelio |
|- | |- | ||
| − | |align=center|( | + | |align=center|(6) |
|ARKS can increase their Attack for a short time by chowing down on Quick Food made with TAMES meat. | |ARKS can increase their Attack for a short time by chowing down on Quick Food made with TAMES meat. | ||
|{{icons|NGS Meat}} Crisp Aelio Meat x5 | |{{icons|NGS Meat}} Crisp Aelio Meat x5 | ||
|Central Aelio (D5) | |Central Aelio (D5) | ||
|- | |- | ||
| − | |align=center|( | + | |align=center|(7) |
|Yellow, blinking Ryuker Devices have yet to be connected. Get them linked up to expand your range of operations. | |Yellow, blinking Ryuker Devices have yet to be connected. Get them linked up to expand your range of operations. | ||
| | | | ||
| − | |Central Aelio ( | + | |Central Aelio |
| + | |- | ||
| + | |align=center|(8) | ||
| + | | | ||
| + | | | ||
| + | |Central Aelio | ||
|- | |- | ||
| − | |align=center|( | + | |align=center|(9) |
|ARKS can increase their Defense for a short time by chowing down on Quick Food made with vegetables. | |ARKS can increase their Defense for a short time by chowing down on Quick Food made with vegetables. | ||
|{{icons|NGS Vegetable}} Light Aelio Mushroom x5 | |{{icons|NGS Vegetable}} Light Aelio Mushroom x5 | ||
|Central Aelio (D5) | |Central Aelio (D5) | ||
|- | |- | ||
| − | |align=center|( | + | |align=center|(1) |
| + | |There are old campsites in the underbrush and in caves around South Aelio. Feel free to keep anything from the Item Containers you may find there. | ||
| + | | | ||
| + | |South Aelio | ||
| + | |- | ||
| + | |align=center|(2) | ||
|The peaks and valleys of South Aelio boast plenty of mountains and waterfalls. Its bountiful natural resources make it a hotspot for mining and fishing. | |The peaks and valleys of South Aelio boast plenty of mountains and waterfalls. Its bountiful natural resources make it a hotspot for mining and fishing. | ||
| | | | ||
| − | |South Aelio | + | |South Aelio |
|- | |- | ||
| − | |align=center|( | + | |align=center|(3) |
|This area holds a bounty of ingredients. You can find some minerals here too. I highly recommend Gathering here! | |This area holds a bounty of ingredients. You can find some minerals here too. I highly recommend Gathering here! | ||
| | | | ||
| − | |South Aelio | + | |South Aelio |
|- | |- | ||
| − | |align=center|( | + | |align=center|(4) |
| − | |||
| − | |||
| − | |||
| − | |||
| − | |||
|Internal photon stores will be bolstered for a short time by chowing down on Quick Food made with fruit. | |Internal photon stores will be bolstered for a short time by chowing down on Quick Food made with fruit. | ||
|{{icons|NGS Fruit}} Rich Aelio Apple x5 | |{{icons|NGS Fruit}} Rich Aelio Apple x5 | ||
| − | |South Aelio ( | + | |South Aelio |
| + | |- | ||
| + | |align=center|(5) | ||
| + | | | ||
| + | | | ||
| + | |South Aelio | ||
|- | |- | ||
| − | |align=center|( | + | |align=center|(6) |
|ARKS can increase their HP for a short time by chowing down on Quick Food made with seafood. | |ARKS can increase their HP for a short time by chowing down on Quick Food made with seafood. | ||
|{{icons|NGS Seafood}} Robust Aelio Lobster x5 | |{{icons|NGS Seafood}} Robust Aelio Lobster x5 | ||
| − | |South Aelio | + | |South Aelio |
|- | |- | ||
| − | |align=center|( | + | |align=center|(7) |
|There's a rumor going around that putting items into a South Aelio Region Mag bolsters the luck of ARKS defenders. | |There's a rumor going around that putting items into a South Aelio Region Mag bolsters the luck of ARKS defenders. | ||
| | | | ||
| − | |South Aelio ( | + | |South Aelio |
| + | |- | ||
| + | |align=center|(8) | ||
| + | | | ||
| + | | | ||
| + | |South Aelio | ||
|- | |- | ||
| − | |align=center|( | + | |align=center|(1) |
| + | | | ||
| + | | | ||
| + | |West Aelio | ||
| + | |- | ||
| + | |align=center|(2) | ||
| + | | | ||
| + | | | ||
| + | |West Aelio | ||
| + | |- | ||
| + | |align=center|(3) | ||
| + | | | ||
| + | | | ||
| + | |West Aelio | ||
| + | |- | ||
| + | |align=center|(4) | ||
| + | | | ||
| + | | | ||
| + | |West Aelio | ||
| + | |- | ||
| + | |align=center|(5) | ||
| + | | | ||
| + | | | ||
| + | |West Aelio | ||
| + | |- | ||
| + | |align=center|(1) | ||
|There are recon supply caches still left in the mountains of North Aelio.<br>Make use of any Item Containers you might come across. | |There are recon supply caches still left in the mountains of North Aelio.<br>Make use of any Item Containers you might come across. | ||
| | | | ||
| − | |North Aelio | + | |North Aelio |
|- | |- | ||
| − | |align=center|( | + | |align=center|(2) |
|You need minerals and ore to enhance your weapons, right? You may just strike the motherlode here. | |You need minerals and ore to enhance your weapons, right? You may just strike the motherlode here. | ||
| | | | ||
| − | |North Aelio | + | |North Aelio |
|- | |- | ||
| − | |align=center|( | + | |align=center|(3) |
|Tossing a North Aelio Region Mag some items will bolster the growth of ARKS defenders... or so they say. | |Tossing a North Aelio Region Mag some items will bolster the growth of ARKS defenders... or so they say. | ||
| | | | ||
| − | |North Aelio ( | + | |North Aelio |
| + | |- | ||
| + | |align=center|(4) | ||
| + | | | ||
| + | | | ||
| + | |North Aelio | ||
|- | |- | ||
| − | |align=center|( | + | |align=center|(5) |
|You won't be able to find many ingredients around here... But there's a veritable bounty of quality minerals to gather. | |You won't be able to find many ingredients around here... But there's a veritable bounty of quality minerals to gather. | ||
| | | | ||
| − | |North Aelio | + | |North Aelio |
|- | |- | ||
| − | |align=center|( | + | |align=center|(6) |
|The wetlands and plateaus of North Aelio stretch far and wide. Sightings have been reported of enormous DOLLS appearing on the plateaus... | |The wetlands and plateaus of North Aelio stretch far and wide. Sightings have been reported of enormous DOLLS appearing on the plateaus... | ||
| | | | ||
| − | |North Aelio ( | + | |North Aelio |
| + | |- | ||
| + | |align=center|(1) | ||
| + | | | ||
| + | | | ||
| + | |Halphia Lake | ||
|- | |- | ||
| − | |align=center|( | + | |align=center|(2) |
| + | | | ||
| + | | | ||
| + | |Halphia Lake | ||
| + | |- | ||
| + | |align=center|(3) | ||
| + | | | ||
| + | | | ||
| + | |Halphia Lake | ||
| + | |- | ||
| + | |align=center|(1) | ||
|Getting up and down Mt. Magnus can be a pain. Making good use of an available Updrafter might make things easier. | |Getting up and down Mt. Magnus can be a pain. Making good use of an available Updrafter might make things easier. | ||
| | | | ||
| − | |Mt. Magnus | + | |Mt. Magnus |
|- | |- | ||
| − | |align=center|( | + | |align=center|(2) |
|Mt. Magnus is a hotspot for DOLLS encounters. Don't let the Item Containers they've brought in go to waste. | |Mt. Magnus is a hotspot for DOLLS encounters. Don't let the Item Containers they've brought in go to waste. | ||
| | | | ||
| − | |Mt. Magnus ( | + | |Mt. Magnus |
| + | |- | ||
| + | |align=center|(1) | ||
| + | | | ||
| + | | | ||
| + | |Vanford Laboratory Ruins | ||
| + | |- | ||
| + | |align=center|(2) | ||
| + | | | ||
| + | | | ||
| + | |Vanford Laboratory Ruins | ||
| + | |- | ||
| + | |align=center|(3) | ||
| + | | | ||
| + | | | ||
| + | |Vanford Laboratory Ruins | ||
| + | |- | ||
| + | |align=center|(1) | ||
| + | | | ||
| + | | | ||
| + | |Resol Forest | ||
| + | |- | ||
| + | |align=center|(2) | ||
| + | | | ||
| + | | | ||
| + | |Resol Forest | ||
| + | |- | ||
| + | |} | ||
| + | |||
| + | ==Datapods (Retem Region)== | ||
| + | |||
| + | {| class="mw-collapsible wikitable" | ||
| + | ! colspan=2 | Datapod Map (Retem Region) | ||
| + | |- | ||
| + | | [[File:NGSDatapodMapRetemV2.jpg|600px]] | ||
|- | |- | ||
|} | |} | ||
| − | |||
{{NGS Navbox}} | {{NGS Navbox}} | ||
Revision as of 01:43, 4 January 2022
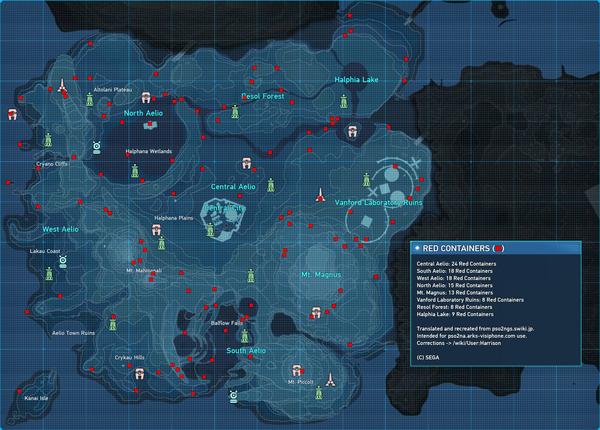
Red Containers (Aelio Region)
| Red Container Map (Aelio Region) | |
|---|---|
| |
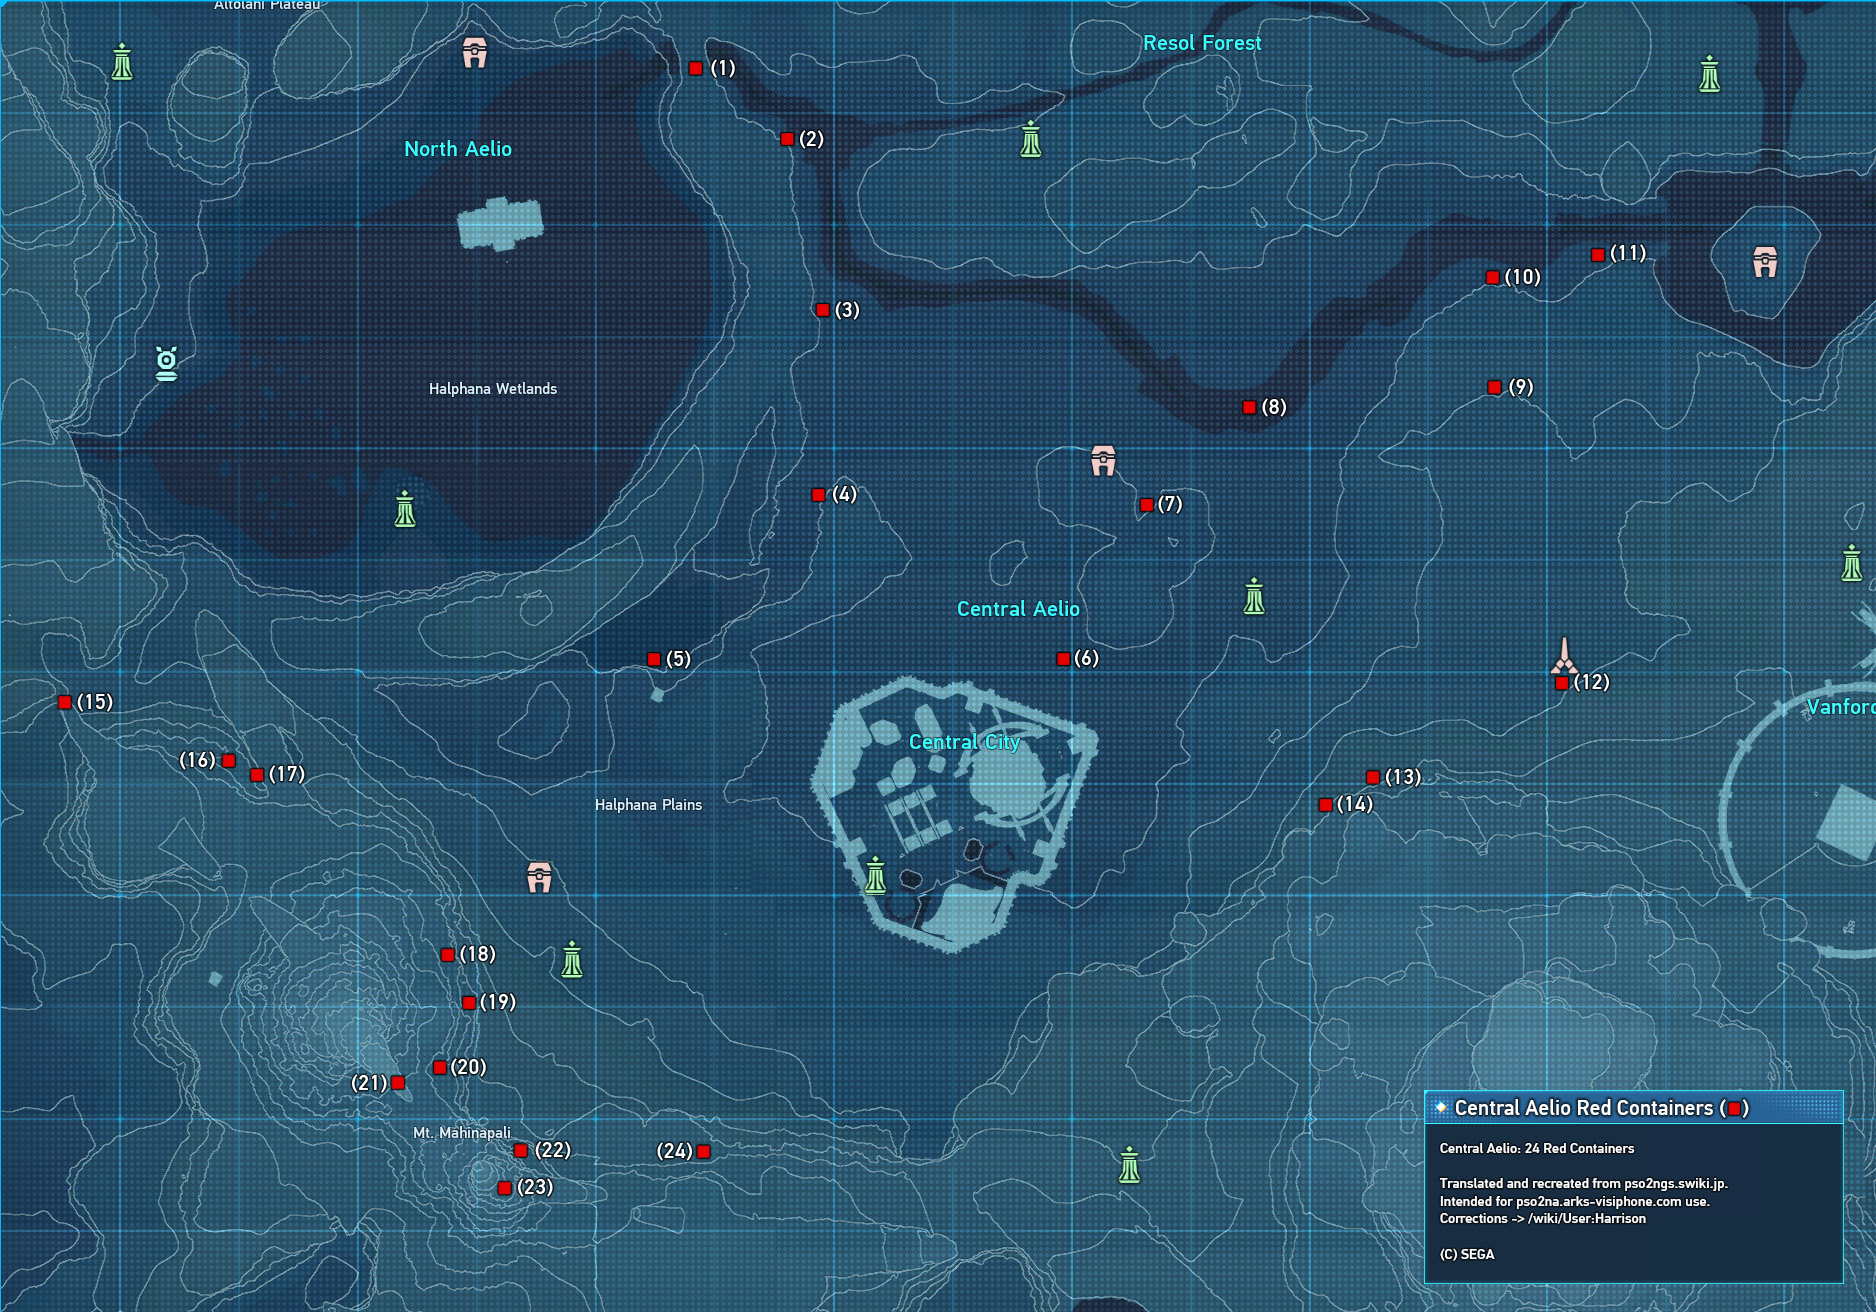
Central Aelio
Please refer to the collapsed image as a reference for the following table:
| Red Container Map (Central Aelio) | |
|---|---|
| |
| Red Container (#) | Rewards |
|---|---|
| (1) | |
| (2) | |
| (3) | |
| (4) | |
| (5) | |
| (6) | |
| (7) | |
| (8) | |
| (9) | |
| (10) | |
| (11) | |
| (12) | |
| (13) | |
| (14) | |
| (15) | |
| (16) | |
| (17) | |
| (18) | |
| (19) | |
| (20) | |
| (21) | |
| (22) | |
| (23) | |
| (24) |
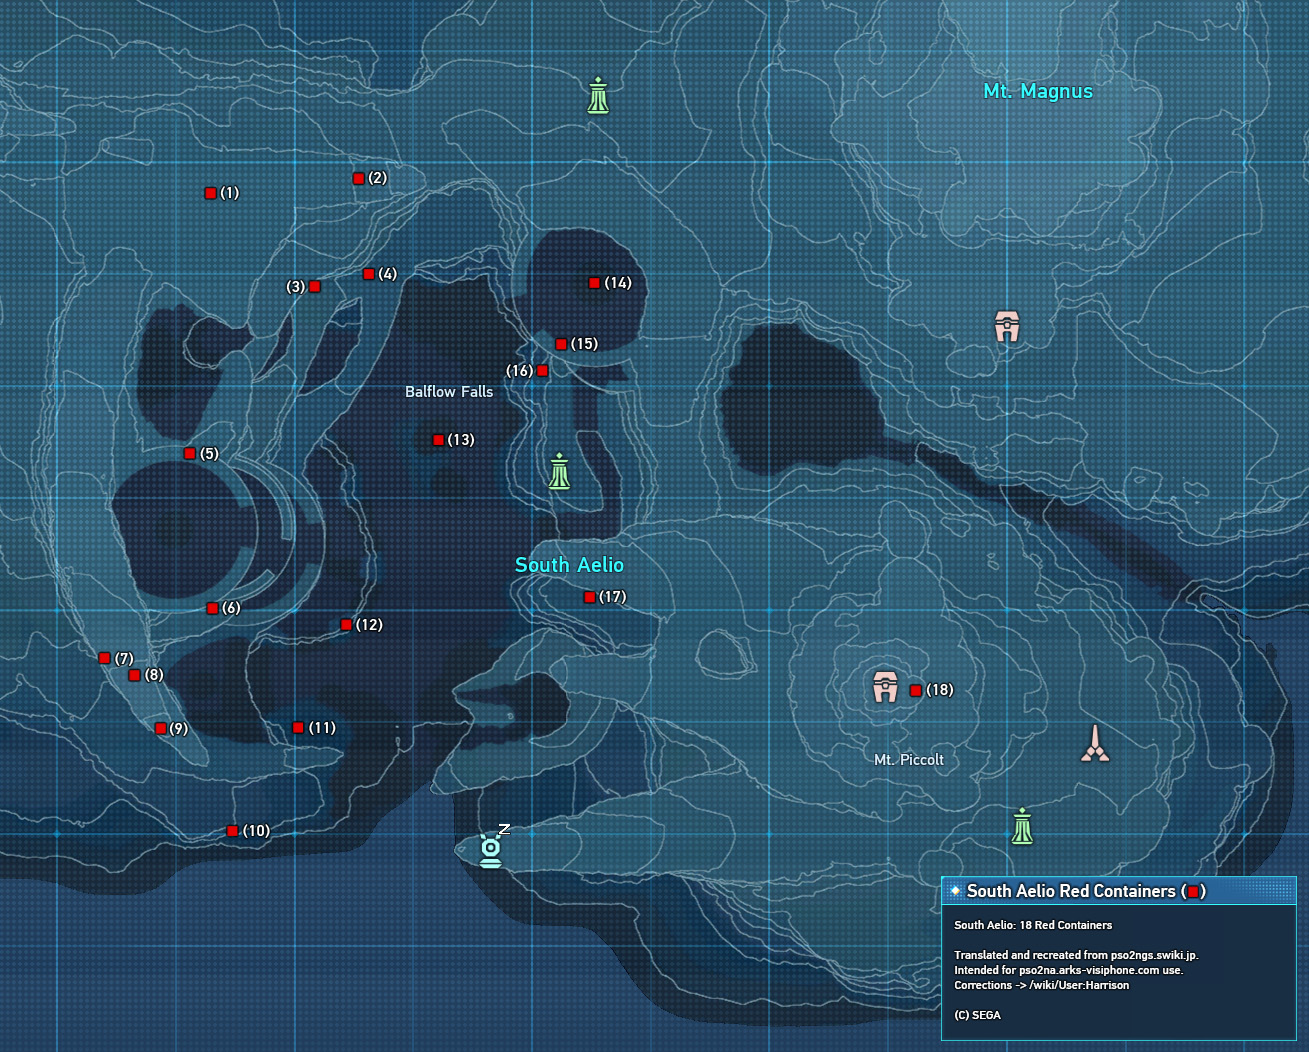
South Aelio
Please refer to the collapsed image as a reference for the following table:
| Red Container Map (South Aelio) | |
|---|---|
| |
| Red Container (#) | Rewards |
|---|---|
| (1) | |
| (2) | |
| (3) | |
| (4) | |
| (5) | |
| (6) | |
| (7) | |
| (8) | |
| (9) | |
| (10) | |
| (11) | |
| (12) | |
| (13) | |
| (14) | |
| (15) | |
| (16) | |
| (17) | |
| (18) |
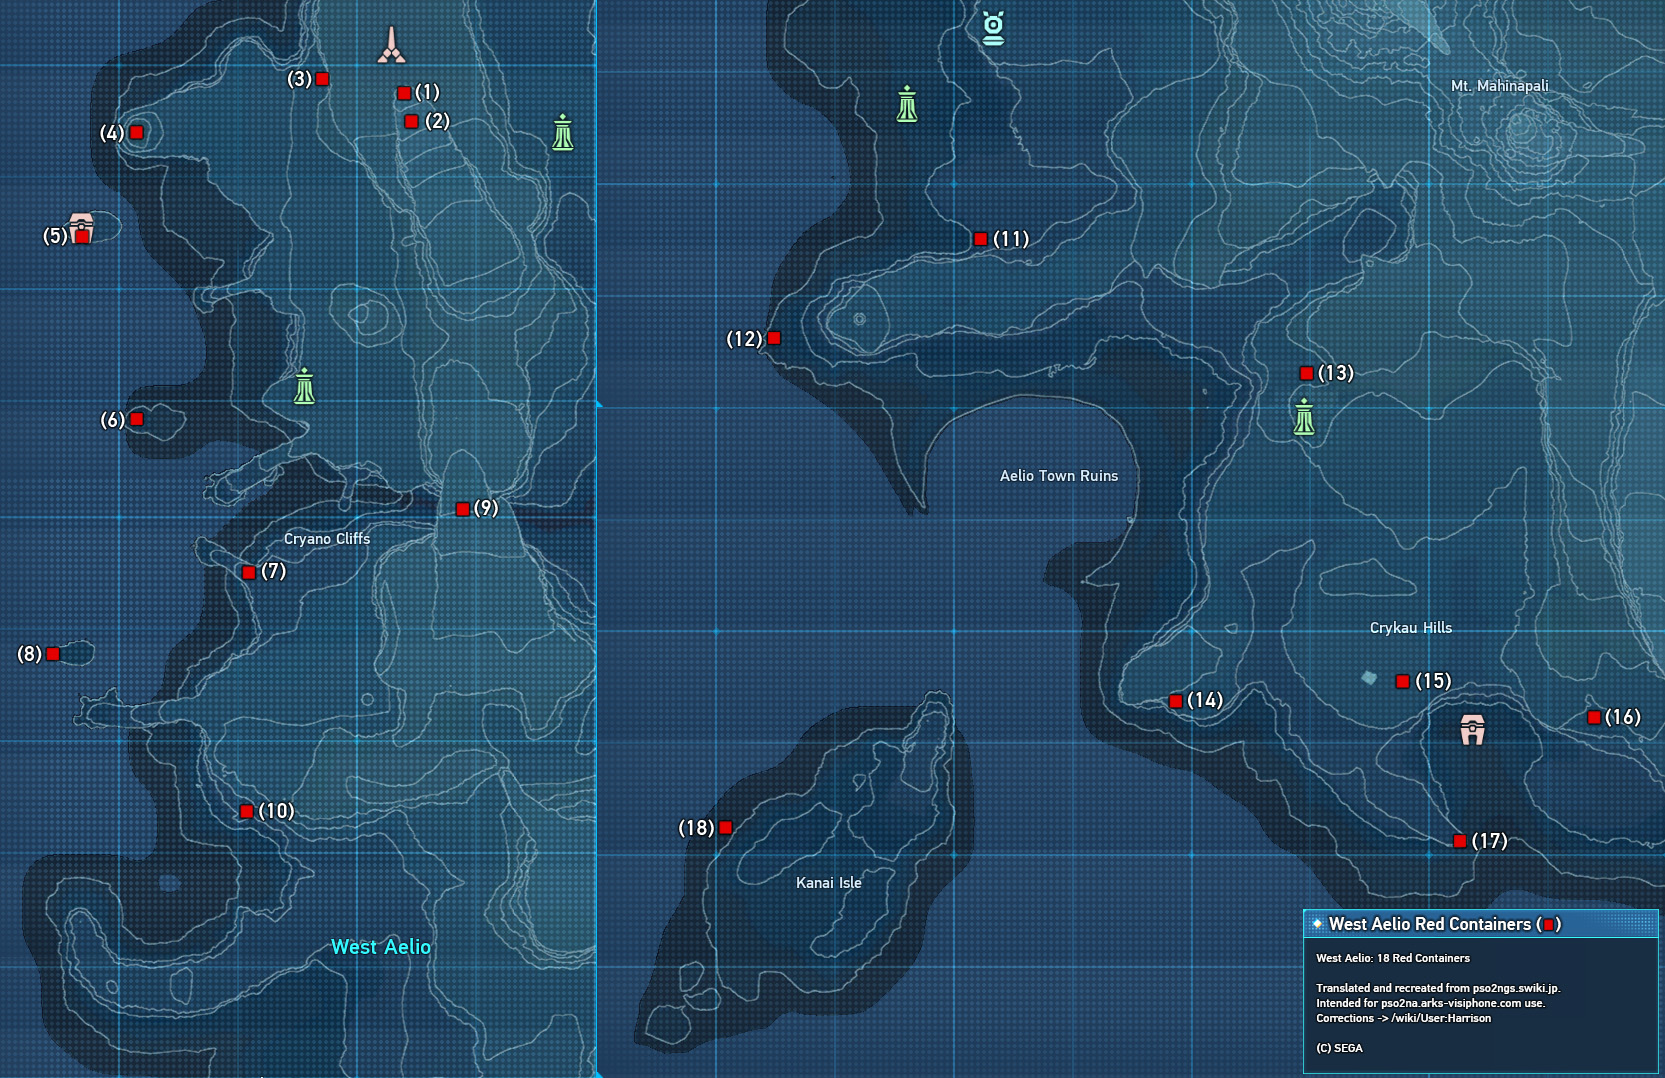
West Aelio
Please refer to the collapsed image as a reference for the following table:
| Red Container Map (West Aelio) | |
|---|---|
| |
| Red Container (#) | Rewards |
|---|---|
| (1) | |
| (2) | |
| (3) | |
| (4) | |
| (5) | |
| (6) | |
| (7) | |
| (8) | |
| (9) | |
| (10) | |
| (11) | |
| (12) | |
| (13) | |
| (14) | |
| (15) | |
| (16) | |
| (17) | |
| (18) |
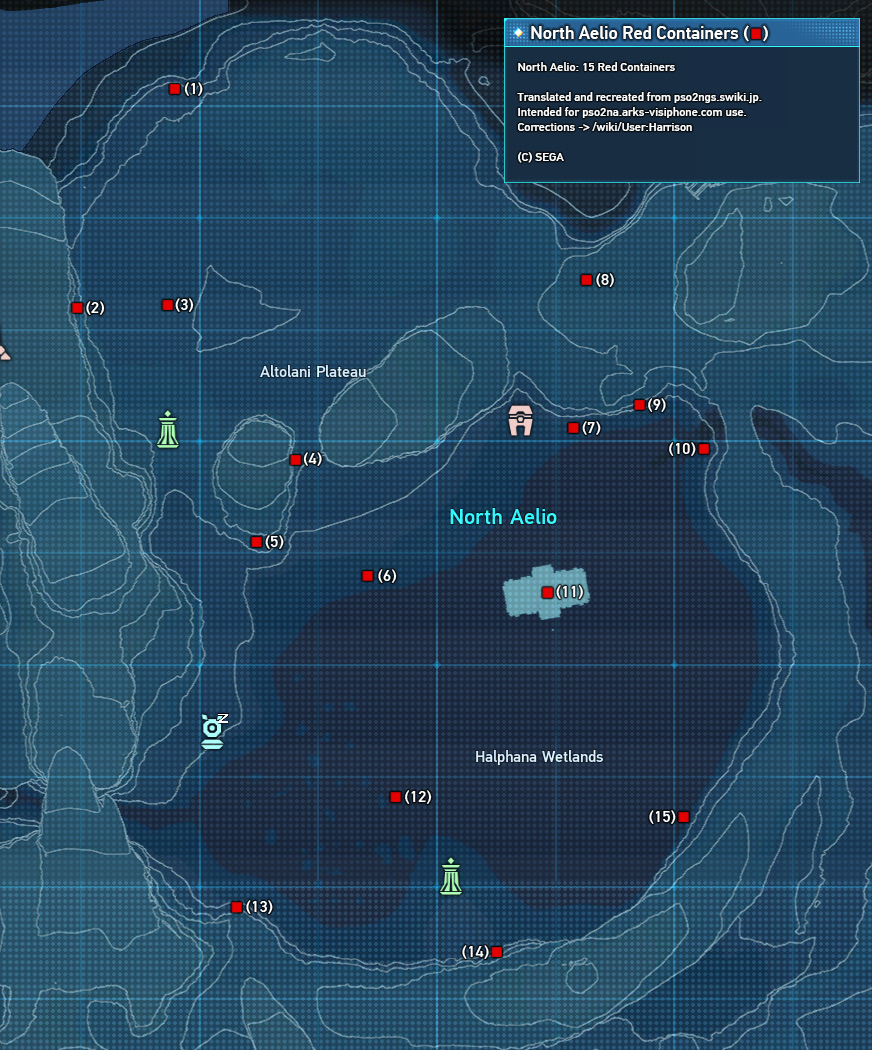
North Aelio
Please refer to the collapsed image as a reference for the following table:
| Red Container Map (North Aelio) | |
|---|---|
| |
| Red Container (#) | Rewards |
|---|---|
| (1) | |
| (2) | |
| (3) | |
| (4) | |
| (5) | |
| (6) | |
| (7) | |
| (8) | |
| (9) | |
| (10) | |
| (11) | |
| (12) | |
| (13) | |
| (14) | |
| (15) |
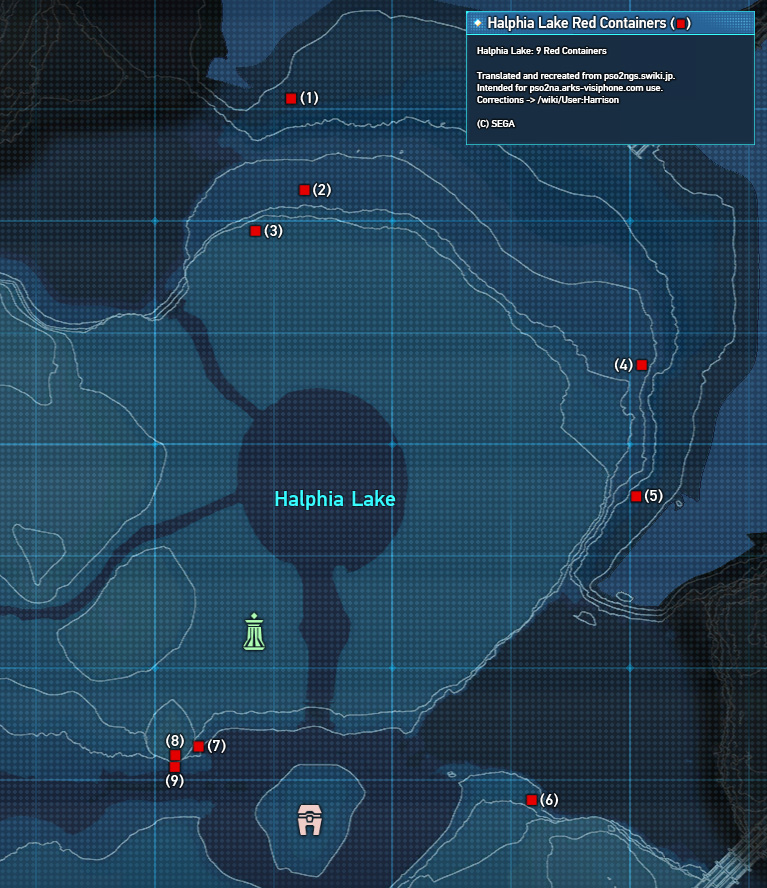
Halphia Lake
Please refer to the collapsed image as a reference for the following table:
| Red Container Map (Halphia Lake) | |
|---|---|
| |
| Red Container (#) | Rewards |
|---|---|
| (1) | |
| (2) | |
| (3) | |
| (4) | |
| (5) | |
| (6) | |
| (7) | |
| (8) | |
| (9) |
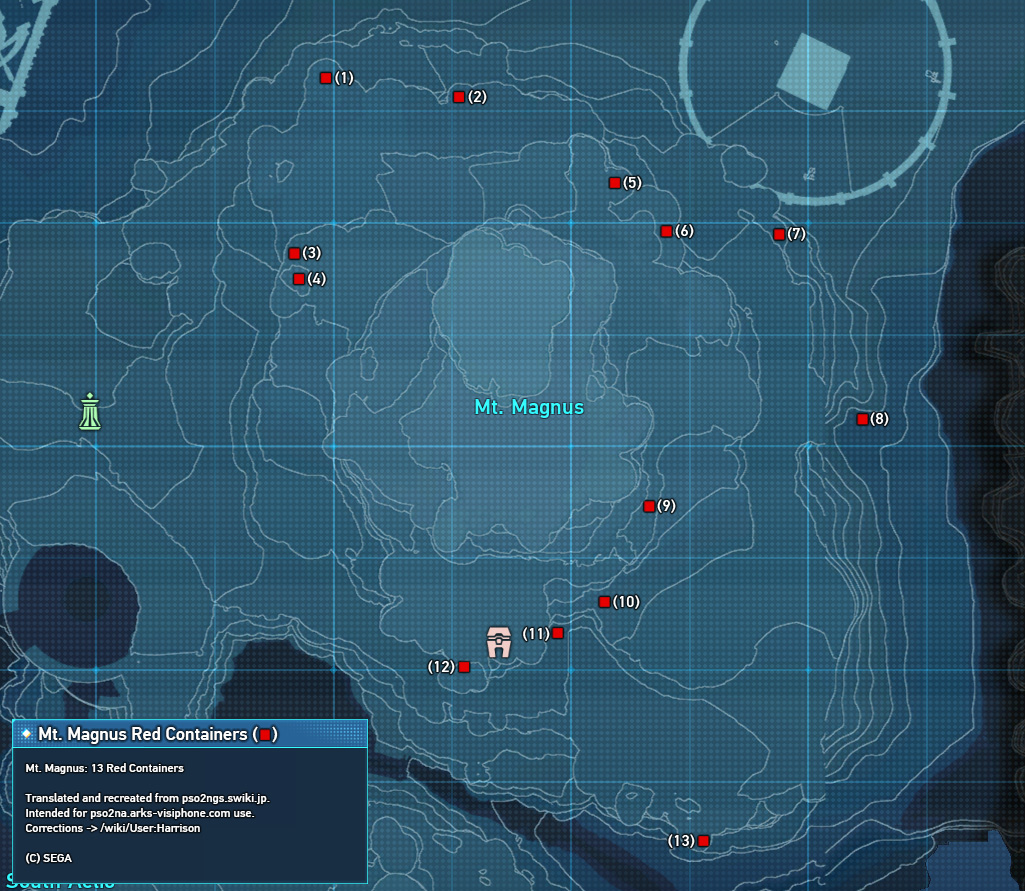
Mt. Magnus
Please refer to the collapsed image as a reference for the following table:
| Red Container Map (Mt. Magnus) | |
|---|---|
| |
| Red Container (#) | Rewards |
|---|---|
| (1) | |
| (2) | |
| (3) | |
| (4) | |
| (5) | |
| (6) | |
| (7) | |
| (8) | |
| (9) | |
| (10) | |
| (11) | |
| (12) | |
| (13) |
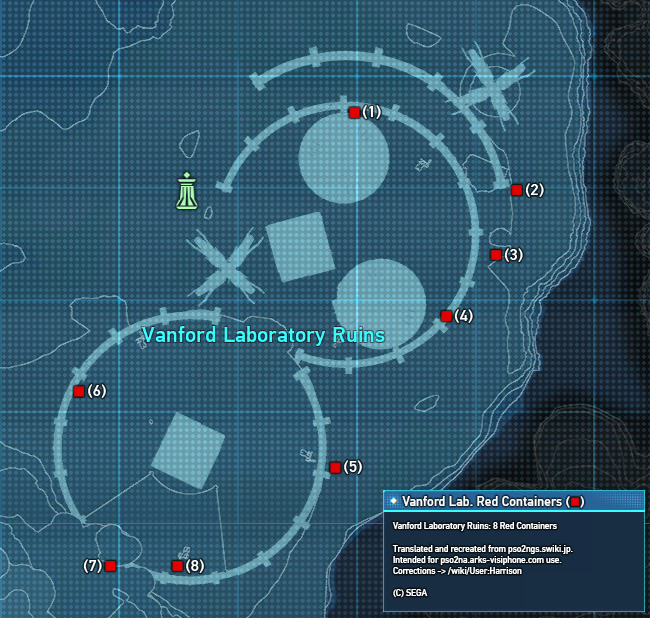
Vanford Laboratory Ruins
Please refer to the collapsed image as a reference for the following table:
| Red Container Map (Vanford Laboratory Ruins) | |
|---|---|
| |
| Red Container (#) | Rewards |
|---|---|
| (1) | |
| (2) | |
| (3) | |
| (4) | |
| (5) | |
| (6) | |
| (7) | |
| (8) |
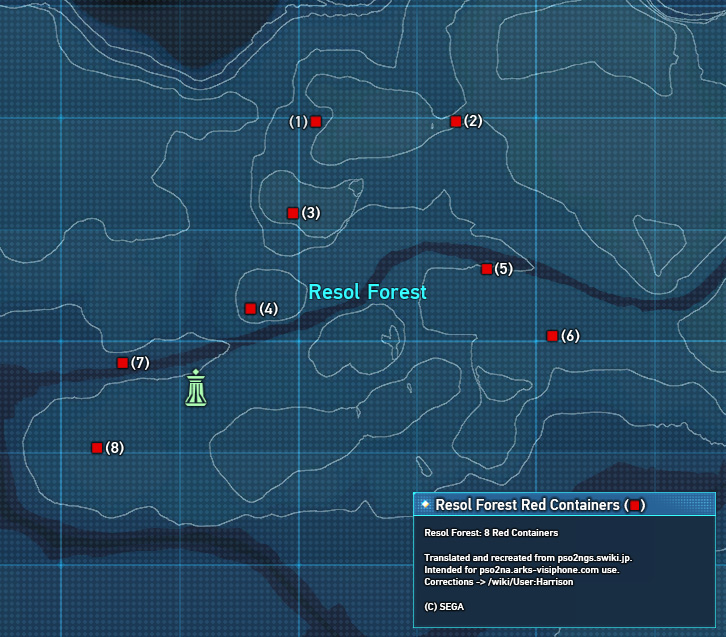
Resol Forest
Please refer to the collapsed image as a reference for the following table:
| Red Container Map (Resol Forest) | |
|---|---|
| |
| Red Container (#) | Rewards |
|---|---|
| (1) | |
| (2) | |
| (3) | |
| (4) | |
| (5) | |
| (6) | |
| (7) | |
| (8) |
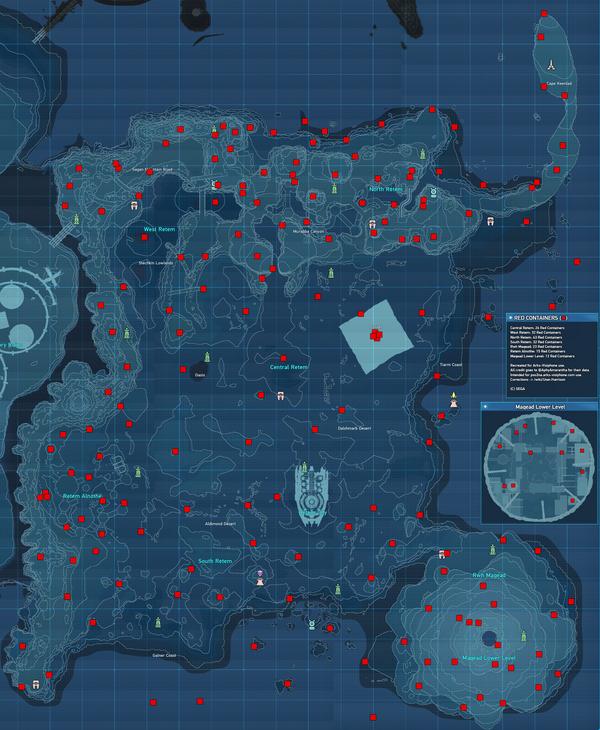
Red Containers (Retem Region)
| Red Container Map (Aelio Region) | |
|---|---|
| |
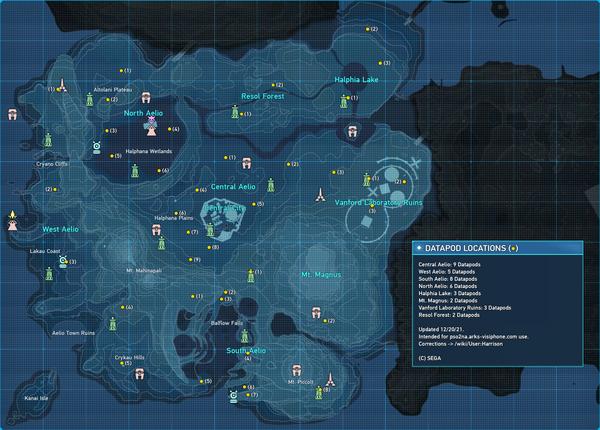
Datapods (Aelio Region)
| Datapod Map (Aelio Region) | |
|---|---|
| |
Datapod Information (Aelio Region)
Please refer to the collapsed image as a reference for the following table:
| Datapod (#) | Contents | Rewards | Location |
|---|---|---|---|
| (1) | There are various colors of Item Containers. You'll definitely find some great stuff in the Gold ones. | Central Aelio | |
| (2) | This area is a cornucopia of fruits and vegetables. It's a great spot for ingredient hunters. | Central Aelio | |
| (3) | You may be able to find abandoned Item Containers near the cliffs of Central Aelio. | Central Aelio | |
| (4) | Central Aelio | ||
| (5) | The wide plains of Central Aelio are spotted with gently sloping hills. Many TAMES inhabit these lands. | Central Aelio | |
| (6) | ARKS can increase their Attack for a short time by chowing down on Quick Food made with TAMES meat. | Central Aelio (D5) | |
| (7) | Yellow, blinking Ryuker Devices have yet to be connected. Get them linked up to expand your range of operations. | Central Aelio | |
| (8) | Central Aelio | ||
| (9) | ARKS can increase their Defense for a short time by chowing down on Quick Food made with vegetables. | Central Aelio (D5) | |
| (1) | There are old campsites in the underbrush and in caves around South Aelio. Feel free to keep anything from the Item Containers you may find there. | South Aelio | |
| (2) | The peaks and valleys of South Aelio boast plenty of mountains and waterfalls. Its bountiful natural resources make it a hotspot for mining and fishing. | South Aelio | |
| (3) | This area holds a bounty of ingredients. You can find some minerals here too. I highly recommend Gathering here! | South Aelio | |
| (4) | Internal photon stores will be bolstered for a short time by chowing down on Quick Food made with fruit. | South Aelio | |
| (5) | South Aelio | ||
| (6) | ARKS can increase their HP for a short time by chowing down on Quick Food made with seafood. | South Aelio | |
| (7) | There's a rumor going around that putting items into a South Aelio Region Mag bolsters the luck of ARKS defenders. | South Aelio | |
| (8) | South Aelio | ||
| (1) | West Aelio | ||
| (2) | West Aelio | ||
| (3) | West Aelio | ||
| (4) | West Aelio | ||
| (5) | West Aelio | ||
| (1) | There are recon supply caches still left in the mountains of North Aelio. Make use of any Item Containers you might come across. |
North Aelio | |
| (2) | You need minerals and ore to enhance your weapons, right? You may just strike the motherlode here. | North Aelio | |
| (3) | Tossing a North Aelio Region Mag some items will bolster the growth of ARKS defenders... or so they say. | North Aelio | |
| (4) | North Aelio | ||
| (5) | You won't be able to find many ingredients around here... But there's a veritable bounty of quality minerals to gather. | North Aelio | |
| (6) | The wetlands and plateaus of North Aelio stretch far and wide. Sightings have been reported of enormous DOLLS appearing on the plateaus... | North Aelio | |
| (1) | Halphia Lake | ||
| (2) | Halphia Lake | ||
| (3) | Halphia Lake | ||
| (1) | Getting up and down Mt. Magnus can be a pain. Making good use of an available Updrafter might make things easier. | Mt. Magnus | |
| (2) | Mt. Magnus is a hotspot for DOLLS encounters. Don't let the Item Containers they've brought in go to waste. | Mt. Magnus | |
| (1) | Vanford Laboratory Ruins | ||
| (2) | Vanford Laboratory Ruins | ||
| (3) | Vanford Laboratory Ruins | ||
| (1) | Resol Forest | ||
| (2) | Resol Forest |
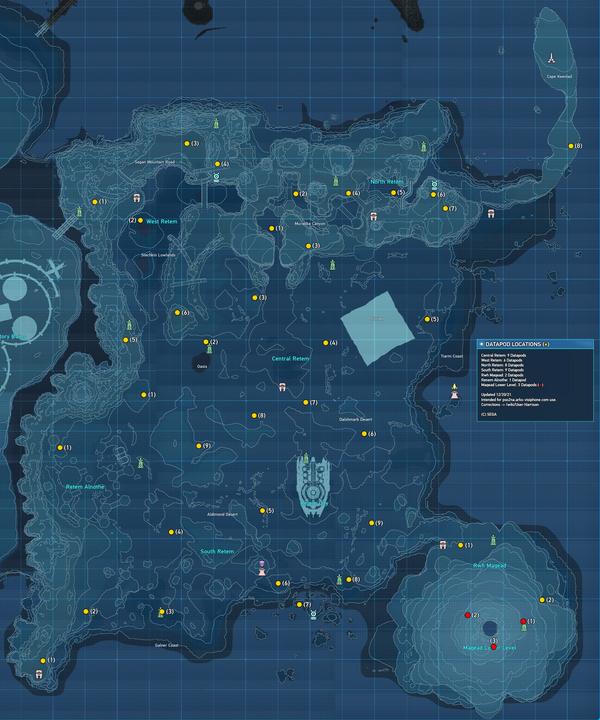
Datapods (Retem Region)
| Datapod Map (Retem Region) | |
|---|---|
| |
| |||||||||||||||||||||||||||||||||||||||||||||||