The Face of The Abyss
| The Face of The Abyss | |
|---|---|

| |
| Quest Type | Urgent Quests |
| Difficulty | |
| Hard | Level 40 and up |
| Super Hard | Level 70 and up |
| Extremely Hard | Level 85 and up |
| Ultra Hard | Level 100 and up |
| Quest Details | |
| Location | Armada War Zone |
| Single/Multi-Party | |
| Party Invitation | Allowed |
| Ally Assistance | Not Allowed |
| Conditions For Acceptance | |
| Hard | Complete a special Client Order |
| Super Hard | Possess a Super Hard Difficulty Permit |
| Extremely Hard | Possess a Super Hard Difficulty Permit |
| Ultra Hard | Possess a Super Hard Difficulty Permit |
| Restrictions | |
| Time Limit | 01:00:00 |
| Damage Limit | None |
| Ability Adjust | None |
Urgent Quest Notices
"Commencing an assault operation on Mothership Shiva. All ARKS operatives should prepare for deployment immediately."
—Initial Announcement Notice
"The assault operation on Mothership Shiva is now underway. This is the final battle. All ARKS operatives, please report to the Quest Counter for deployment."
—Announcement Notice
Quest Objective
Defeat the Primordial Darkness.
Quest Description
We are giving everything that ARKS has left for this final battle to put an end to this eternal war. The fate of the universe rests on the outcome. We pray for your victory, operatives.
You will fail this quest if:
You retire after becoming incapacitated.
All party members become incapacitated.
The time limit expires.
Ranking
- This Quest has special ranking requirements. The ranking requirements are on a per-player basis. Ranking affects drops.
| Defeat Enemies | 600 pts |
|---|---|
| Incapacitations | 300 pts (-50 pts for each incapacitation past the 6th) |
| Quest Completion | 100 pts (After 35 minutes have been elapsed, subtract 1pt every second) |
| Max Score | 1000 pts |
Enemies
| Enemy List |
|---|
Notes & Strategy
- This quest is not available in the Normal and Very Hard difficulties.
- The quest can roughly be divided up into 3 main phases in terms of mechanics: the initial battle against Gomorus, Primordial Darkness, the battle against the first and second forms of Sodam, Primordial Darkness, and the battle against the final form of Sodam, Primordial Darkness. The first two phases are identical to the final Episode 6 Story Quest, except allowing 12 players instead of being a solo quest.
- You can talk to the NPCs present in the waiting areas and the final loot area for additional story tidbits.
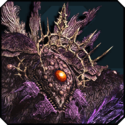
Gomorus, Primordial Darkness
- Face the titanic manifestation of the ultimate darkness in a swirling vortex of the space-time ravine. A small number of platforms provide secure footing in the vortex, connected by jump pads at either end.
- You are invulnerable during the flying portion of taking a jump pad.
- Taking a jump pad puts you in a dashing state like after taking a Dash Panel, including the ability to boost kick.
- Gomorus can break the platforms on which you are standing. If you are on the platform when it is broken, it will instantly incapacitate you. Invulnerability frames are ignored.
- A platform that is targeted will be marked by red circles both on the platform itself and on the minimap. While you are on a targeted platform, a warning will also be displayed on-screen.
- Taking a jump pad to a broken platform will instantly incapacitate you.
- See Gomorus, Primordial Darkness for more information.
- It is possible for Gomorus to break one of the middle platforms before doing its sweeping breath attack, giving you no place to run. In such a case, you must rely on invulnerability frames such as taking a jump pad to avoid the breath attack (but be careful not to jump to a broken platform).
- On the final third phase of this stage and when low on HP, Gomorus will begin a DPS check mode and charge up an attack from its large eye, which can be repeatedly interrupted by dealing enough damage.
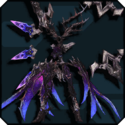
Sodam, Primordial Darkness
- The true form of the ultimate darkness emerges from the fallen hulk of Gomorus.
First Form
- Sodam will assume one of four styles based on one of four elements:
 Fire,
Fire,  Ice,
Ice,  Lightning, and
  Wind, with its wings also denoting it.
 - Sodam will change its element style after some time.
- Sodam has no element weakness, but has weakness to a selection of weapon types that are randomly chosen and assigned to each element style, which are maintained for the duration of the eq. The selection of weapon weaknesses will generally follow this template:


- Sodam can be downed briefly by doing a sufficient amount of damage to it using a weapon that it is weak to. Doing so will cause Sodam to lose its element style and associated weapon weaknesses while it is downed. After recovering from the down, Sodam will use a different element style.
- The field will change to match the element that Sodam is using:
- Fire field (Red) - Fire Wall: The outer edge of the arena will be a damaging fire wall. Coming into contact with it will deal heavy damage.
- Ice field (Blue) - Ice Pillars: A number of large pillars of ice will be present in the arena. They can be used for cover from some of Sodam's powerful Blizzard attack.
- Lightning field (Purple) - Water Spheres: Two destructible water spheres will appear above puddles of water. If hit by one of Sodam's lightning attacks, the puddle will turn into a damage-over-time area. Destroying the sphere will dissipate the puddle and end the damage-over-time area.
- Wind field (Yellow) - Tornado: A large tornado will appear in the center of the stage. Entering the tornado will (harmlessly) launch you up into the air. Use the tornado to avoid Sodam's Earth Shattering attack.
Second Form
- After a brief transition cutscene, Sodam will begin to use one of two pairs of elements : or , being capable of using the attacks of both elements as well as a unique compound attack, with its wings also denoting it.
- The stage will also have both of the combined element style's features.
- Sodam will have a combination of the weapon weaknesses associated with both element styles, generally following this template:
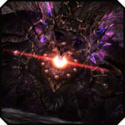
Sodam, Primordial Darkness - Final Form
- When Sodam is low on HP, it will transition to its final form, merging with the husk of Gomorus and being embedded in the large eye for the final stretch. This phase is not featured in the story quest.
- Sodam in this form is weak to
 , like Gomorus, and no longer has weapon weaknesses.
Damage Field
- During the transition cutscene, Sodam (Gomorus) will use its fluid breath to create a flooded damage pool in front of it.
- All players will be teleported to the back of the arena at the start of the cutscene, but it is possible to move during the cutscene and wander too far forward into the damage pool.
- Standing in the pool results in taking a large amount of damage over time as well as being staggered. While it is possible to use invulnerability frames and counter to stay in the pool, the pool's damage tick rate is much more rapid compared to other damage fields such as lava.
- Sodam (Gomorus) will always end this cutscene by starting with the left side arm first.
- Occasionally, such as after being staggered successfully, Sodam (Gomorus) will unleash a highly damaging laser attack that covers the middle of the field, which is best avoided by staying at the sides.
- This is a DPS check!
- The pool initially covers 50% of the arena.
- The pool advances by 25% every time Sodam (Gomorus) repeats its fluid breath attack.
- The pool recedes by 25% if sufficient damage is done to Sodam (Gomorus)'s hands.
- If DPS is insufficient, the entire arena can eventually be covered, causing all players to rapidly take damage over time.
- If the pool is fully eradicated, the Gomorus portion will be downed regardless of remaining HP, allowing players to hit the embedded Sodam.
Breakable Parts
- On each of Sodam (Gomorus)'s hands, there are 10 golden armor pieces (two per finger).
- The armor pieces are considered separate entities from Sodam - any attack that has an area of effect can hit multiple of them at once in addition to Sodam's main hand.
- The armor pieces are vulnerable to
 Burn and
  Poison, applying a damage over time to it that ticks for 9,999,999 damage on Ultra Hard.
- However, since the armor pieces themselves have rather low HP, they will break rather quickly before this damage can rack up.
- Breaking all 20 parts will unlock a random support effect from one of the three Heroines, based on how much of the Party voted on it by talking to them during the waiting area:
- Matoi's Prayer: +200% Max HP (Triple), +200 PP, +30% Attack, revives all incapacitated ARKS at the time of effect
- Hitsugi's Ambition: A number of red spears will pin down Sodam's hands, dealing minor damage and stunning Sodam for several seconds.
- Harriet's Order: A massive attack is launched at Sodam, dealing heavy damage (~1.5 million damage on Hard, over 8 million on Ultra Hard)
- After receiving a support effect, the 20 parts will be restored. They can be broken again to receive another support effect until all 3 have been unlocked.
Final Down
- Sodam's - now embedded in Gomorus's large eye - is exposed and vulnerable to be finished off.
- Sodam has one final trick up its sleeve - once every few seconds, it will unleash a powerful shockwave triggered by closing its wings that can do upwards of ~6000 damage on Ultra Hard.
- This is soft DPS check: Sodam can be staggered out of the attack by dealing enough damage. If the party's DPS is sufficient, it is possible to prevent any shockwaves from successfully going off.
- It is possible to use invulnerability frames or guarding to avoid the shockwave. The shockwave is emitted when Sodam spreads its wings - watch for the cue.
- If a player is still dead on Mission Clear, they will not receive the quest's kill points and will earn a C rank instead. Therefore, it is important that everyone stays alive as well as outputting as much damage as possible, and/or bring Half Dolls if direly necessarily.
Drop Info
The following items can drop at the end of the Quest from breaking the crystal.
| Category | Item Name | Notes | |
|---|---|---|---|
| Weapons |
|
(XH and higher) | |
|
(UH) | ||
|
(XH and higher) | ||
|
(XH and higher) | ||
|
(SH and higher) | ||
| Units |
|
(XH and higher) | |
| Eggs | (XH and higher) | ||
| Sweets |
|
(UH) Can drop for all classes. | |
| Weapon Camos |
|
||
| Other | S Rank: (SH) 0 ~ 2 Pieces S Rank: (XH) 0 ~ 2 Pieces | ||
| Augments | |||
| S-Grade Augments (Units) |
Drops as a capsule in UH difficulty. | ||
| May be granted to Unit drops on UH difficulty. | |||
Additional Info
- Clearing this Urgent Quest will allow you to receive a Rare Drop Rate boost of up to +150% after the Quest period ends based on the number of clears from all players on the Ship.
| Quests | ||
| Main Quests | Expeditions | Urgent Quests | Recommended Quests | Bonus Quests | Limited Time Quests | |
| Sub Quests | ARKS Quests | Time Attack Quests | Buster Quests | Endless Quests | Ridroid Quests Divide Quests | Advance Quests | Extreme Quests | Ultimate Quests | Challenge Quests | |
| Story Quests | Story Overview EPISODE 1 | EPISODE 2 | EPISODE 3 | EPISODE 4 | EPISODE 5 | EPISODE 6 | |
| |||||||||||||||||||||||||||||||||||||||||||||||