Difference between revisions of "Twisted with Hatred"
m |
m |
||
| (8 intermediate revisions by 5 users not shown) | |||
| Line 45: | Line 45: | ||
|} | |} | ||
| − | + | ==Urgent Quest Notices== | |
| + | {{quote|"Commencing an assault operation on Mothership Shiva. All ARKS operatives should prepare for deployment immediately."|Initial Announcement Notice}} | ||
| + | {{quote|"The assault operation on Mothership Shiva is now underway. This is the final battle. All ARKS operatives, please report to the Quest Counter for deployment."|Announcement Notice}} | ||
| + | |||
==Quest Objective== | ==Quest Objective== | ||
Defeat the Primordial Darkness. | Defeat the Primordial Darkness. | ||
| Line 76: | Line 79: | ||
==Enemies== | ==Enemies== | ||
| − | + | {| class="wikitable style="text-align:center; margin-left:auto; margin-right:auto; width:50%" | |
| − | <gallery mode=nolines heights=125px widths=125px style=text-align: | + | ! Enemy List |
| − | File:UIEnemyGommorus.png|link= | + | |- |
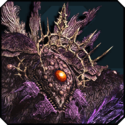
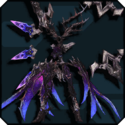
| − | File:UIEnemySodam.png|link=Sodam, Primordial Darkness|[[Sodam, Primordial Darkness|Hateful Sodam, Primordial Darkness]] | + | | <gallery mode=nolines heights=125px widths=125px style=text-align:center> |
| + | File:UIEnemyGommorus.png|link=Gomorus, Primordial Darkness|[[Tainted Enemies#Gomorus, Primordial Darkness|Hateful Gomorus, Primordial Darkness]]<br>{{icons|Light}} | ||
| + | File:UIEnemySodam.png|link=Sodam, Primordial Darkness|[[Tainted Enemies#Sodam, Primordial Darkness|Hateful Sodam, Primordial Darkness]] | ||
| + | File:UIEnemySodam.png|link=Sodam, Primordial Darkness|[[Tainted Enemies#Sodam, Primordial Darkness (Final Form)|Hateful Sodam, Primordial Darkness (Final Form)]]<br>{{icons|Light}} | ||
</gallery> | </gallery> | ||
| + | |} | ||
==Notes== | ==Notes== | ||
* '''This Quest has an incapacitation limit.''' If the incapacitation count reaches two or higher, the Quest will automatically fail. | * '''This Quest has an incapacitation limit.''' If the incapacitation count reaches two or higher, the Quest will automatically fail. | ||
| Line 92: | Line 99: | ||
* Instead of four ice pillar barricades, only one ice pillar barricade will spawn during Sodam's ice stage to guard against its ultimate attacks. The spawn position of the ice pillar every time Sodam switches into the ice stage appears to be entirely random, and can be at the North, South, East or West. | * Instead of four ice pillar barricades, only one ice pillar barricade will spawn during Sodam's ice stage to guard against its ultimate attacks. The spawn position of the ice pillar every time Sodam switches into the ice stage appears to be entirely random, and can be at the North, South, East or West. | ||
* Sodam's phase after its combined element phase is appended with a brand new "elementless" phase where Sodam's attacks become greatly enhanced. | * Sodam's phase after its combined element phase is appended with a brand new "elementless" phase where Sodam's attacks become greatly enhanced. | ||
| − | * Sodam- | + | * Sodam-Gomorus fusion final phase attacks execute significantly faster. |
===Elementless Sodam=== | ===Elementless Sodam=== | ||
| Line 113: | Line 120: | ||
*'''Black Hole Ruptures''': Sodam does its standard black hole suction move with its outstretched right arm but then summons a series of black holes in addition that explode one after another. | *'''Black Hole Ruptures''': Sodam does its standard black hole suction move with its outstretched right arm but then summons a series of black holes in addition that explode one after another. | ||
*'''Gate of Babylon''': Sodam teleports to the north of the field, disappearing entirely and summons a series of 20 or so dark circles with triangles in the middle of them that look like the eye of providence that fire around 5 salvos of light arrows each, overwhelming the field, similar to Mitra's attack. The northern-most spot in front of Sodam is a safe spot, although one can just keep distance from the light arrows instead. | *'''Gate of Babylon''': Sodam teleports to the north of the field, disappearing entirely and summons a series of 20 or so dark circles with triangles in the middle of them that look like the eye of providence that fire around 5 salvos of light arrows each, overwhelming the field, similar to Mitra's attack. The northern-most spot in front of Sodam is a safe spot, although one can just keep distance from the light arrows instead. | ||
| − | *'''Style Purge''': Sodam makes a loud inhaling noise or screech and telegraphs a cylinder of 6 lasers. After firing its short range chest explosion it follows up with a burst stream of the 6 lasers. These lasting lasers rotate outwards like a fan by as much as 30 degrees in an attempt to inflict even more damage to those that did not counter the | + | *'''Style Purge''': Sodam makes a loud inhaling noise or screech and telegraphs a cylinder of 6 lasers. After firing its short range chest explosion it follows up with a burst stream of the 6 lasers. These lasting lasers rotate outwards like a fan by as much as 30 degrees in an attempt to inflict even more damage to those that did not counter the chest explosion head on. Even while the lasers are rotating outwards Sodam can go into another attack, such as the Three Swipe Summon Eyes Combo. |
*'''Homing Explosion''': As with the regular Sodam phases, a ring circle will repeatedly sound and track the player's location and will explode after a period of time, inflicting bind. | *'''Homing Explosion''': As with the regular Sodam phases, a ring circle will repeatedly sound and track the player's location and will explode after a period of time, inflicting bind. | ||
| Line 162: | Line 169: | ||
{{icons|Soaring Blades}} [[Rinser Maroso]]<br> | {{icons|Soaring Blades}} [[Rinser Maroso]]<br> | ||
{{icons|Gunblade}} [[Rinser Talassa]]<br> | {{icons|Gunblade}} [[Rinser Talassa]]<br> | ||
| − | {{icons|Rifle}} [[Rinser | + | {{icons|Rifle}} [[Rinser Tengl]]<br> |
{{icons|Launcher}} [[Rinser Urdha]]<br> | {{icons|Launcher}} [[Rinser Urdha]]<br> | ||
{{icons|Twin Machineguns}} [[Rinser Bolea]]<br> | {{icons|Twin Machineguns}} [[Rinser Bolea]]<br> | ||
| Line 264: | Line 271: | ||
| {{rarity|13}} Klauz Series | | {{rarity|13}} Klauz Series | ||
|- | |- | ||
| − | |{{icons|Back}}{{rarity|13}} Back / Klauzdyne<br> | + | |{{icons|Back}}{{rarity|13}} [[Back_Units_List|Back / Klauzdyne]]<br> |
| − | {{icons|Arm}}{{rarity|13}} Arms / Klauznum<br> | + | {{icons|Arm}}{{rarity|13}} [[Arm_Units_List|Arms / Klauznum]]<br> |
| − | {{icons|Leg}}{{rarity|13}} Legs / Klauzment | + | {{icons|Leg}}{{rarity|13}} [[Leg_Units_List|Legs / Klauzment]] |
|} | |} | ||
{| class="wikitable mw-collapsible mw-collapsed table-bordered table-responsive-md" | {| class="wikitable mw-collapsible mw-collapsed table-bordered table-responsive-md" | ||
| {{rarity|13}} Atlas Series | | {{rarity|13}} Atlas Series | ||
|- | |- | ||
| − | |{{icons|Back}}{{rarity|13}} Back / Atlas Shemel<br> | + | |{{icons|Back}}{{rarity|13}} [[Back_Units_List|Back / Atlas Shemel]]<br> |
| − | {{icons|Arm}}{{rarity|13}} Arms / Atlas Chatten<br> | + | {{icons|Arm}}{{rarity|13}} [[Arm_Units_List|Arms / Atlas Chatten]]<br> |
| − | {{icons|Leg}}{{rarity|13}} Legs / Atlas Kvar | + | {{icons|Leg}}{{rarity|13}} [[Leg_Units_List|Legs / Atlas Kvar]] |
|} | |} | ||
{| class="wikitable mw-collapsible mw-collapsed table-bordered table-responsive-md" | {| class="wikitable mw-collapsible mw-collapsed table-bordered table-responsive-md" | ||
| {{rarity|13}} Rivalate Series | | {{rarity|13}} Rivalate Series | ||
|- | |- | ||
| − | |{{icons|Back}}{{rarity|13}} Back / Rivalate Ful<br> | + | |{{icons|Back}}{{rarity|13}} [[Back_Units_List|Back / Rivalate Ful]]<br> |
| − | {{icons|Arm}}{{rarity|13}} Arms / Rivalate One<br> | + | {{icons|Arm}}{{rarity|13}} [[Arm_Units_List|Arms / Rivalate One]]<br> |
| − | {{icons|Leg}}{{rarity|13}} Legs / Rivalate Mas | + | {{icons|Leg}}{{rarity|13}} [[Leg_Units_List|Legs / Rivalate Mas]] |
|} | |} | ||
{| class="wikitable mw-collapsible mw-collapsed table-bordered table-responsive-md" | {| class="wikitable mw-collapsible mw-collapsed table-bordered table-responsive-md" | ||
| {{rarity|13}} Trailblazer Series | | {{rarity|13}} Trailblazer Series | ||
|- | |- | ||
| − | |{{icons|Back}}{{rarity|13}} Back / Trailblazer Drape Paxion<br> | + | |{{icons|Back}}{{rarity|13}} [[Back_Units_List|Back / Trailblazer Drape Paxion]]<br> |
| − | {{icons|Arm}}{{rarity|13}} Arms / Trailblazer Mount Bixion<br> | + | {{icons|Arm}}{{rarity|13}} [[Arm_Units_List|Arms / Trailblazer Mount Bixion]]<br> |
| − | {{icons|Leg}}{{rarity|13}} Legs / Trailblazer Decor Raxion | + | {{icons|Leg}}{{rarity|13}} [[Leg_Units_List|Legs / Trailblazer Decor Raxion]] |
|} | |} | ||
{| class="wikitable mw-collapsible mw-collapsed table-bordered table-responsive-md" | {| class="wikitable mw-collapsible mw-collapsed table-bordered table-responsive-md" | ||
| {{rarity|13}} Ophistia Series | | {{rarity|13}} Ophistia Series | ||
|- | |- | ||
| − | |{{icons|Back}}{{rarity|13}} Back / Ofzehazala<br> | + | |{{icons|Back}}{{rarity|13}} [[Back_Units_List|Back / Ofzehazala]]<br> |
| − | {{icons|Arm}}{{rarity|13}} Arms / Ofzeterico<br> | + | {{icons|Arm}}{{rarity|13}} [[Arm_Units_List|Arms / Ofzeterico]]<br> |
| − | {{icons|Leg}}{{rarity|13}} Legs / Ofzereevle | + | {{icons|Leg}}{{rarity|13}} [[Leg_Units_List|Legs / Ofzereevle]] |
|} | |} | ||
{| class="wikitable mw-collapsible mw-collapsed table-bordered table-responsive-md" | {| class="wikitable mw-collapsible mw-collapsed table-bordered table-responsive-md" | ||
| {{rarity|13}} Novel Series | | {{rarity|13}} Novel Series | ||
|- | |- | ||
| − | |{{icons|Back}}{{rarity|13}} Back / Novel Ful<br> | + | |{{icons|Back}}{{rarity|13}} [[Back_Units_List|Back / Novel Ful]]<br> |
| − | {{icons|Arm}}{{rarity|13}} Arms / Novel One<br> | + | {{icons|Arm}}{{rarity|13}} [[Arm_Units_List|Arms / Novel One]]<br> |
| − | {{icons|Leg}}{{rarity|13}} Legs / Novel Mas | + | {{icons|Leg}}{{rarity|13}} [[Leg_Units_List|Legs / Novel Mas]] |
|} | |} | ||
{| class="wikitable mw-collapsible mw-collapsed table-bordered table-responsive-md" | {| class="wikitable mw-collapsible mw-collapsed table-bordered table-responsive-md" | ||
| Line 307: | Line 314: | ||
|- | |- | ||
|{{icons|Back}}{{rarity|13}} Back / Schvelle Kibbs<br> | |{{icons|Back}}{{rarity|13}} Back / Schvelle Kibbs<br> | ||
| − | {{icons|Arm}}{{rarity|13}} Arms / Schvelle Ritt<br> | + | {{icons|Arm}}{{rarity|13}} [[Arm_Units_List|Arms / Schvelle Ritt<br> |
| − | {{icons|Leg}}{{rarity|13}} Legs / Schvelle Cerbe | + | {{icons|Leg}}{{rarity|13}} [[Leg_Units_List|Legs / Schvelle Cerbe |
|} | |} | ||
| | | | ||
| Line 317: | Line 324: | ||
| {{rarity|13}} Coated Series | | {{rarity|13}} Coated Series | ||
|- | |- | ||
| − | |{{icons|Weapon Camo}}{{icons|Sword}} * Coated Edge<br> | + | |{{icons|Weapon Camo}}{{icons|Sword}} [[Weapon Camos|* Coated Edge]]<br> |
| − | {{icons|Weapon Camo}}{{icons|Twin Machineguns}} * Coated Barrel<br> | + | {{icons|Weapon Camo}}{{icons|Twin Machineguns}} [[Weapon Camos|* Coated Barrel]]<br> |
| − | {{icons|Weapon Camo}}{{icons|Talis}} * Coated Talis<br> | + | {{icons|Weapon Camo}}{{icons|Talis}} [[Weapon Camos|* Coated Talis]]<br> |
| − | {{icons|Weapon Camo}}{{icons|Katana}} * Coated Sabre<br> | + | {{icons|Weapon Camo}}{{icons|Katana}} [[Weapon Camos|* Coated Sabre]]<br> |
| − | {{icons|Weapon Camo}}{{icons|Rifle}} * Coated Assault<br> | + | {{icons|Weapon Camo}}{{icons|Rifle}} [[Weapon Camos|* Coated Assault]]<br> |
| − | {{icons|Weapon Camo}}{{icons|Rod}} * Coated Rod<br> | + | {{icons|Weapon Camo}}{{icons|Rod}} [[Weapon Camos|* Coated Rod]]<br> |
| − | {{icons|Weapon Camo}}{{icons|Double Saber}} * Coated Doubliss<br> | + | {{icons|Weapon Camo}}{{icons|Double Saber}} [[Weapon Camos|* Coated Doubliss]]<br> |
| − | {{icons|Weapon Camo}}{{icons|Soaring Blades}} * Coated Glide<br> | + | {{icons|Weapon Camo}}{{icons|Soaring Blades}} [[Weapon Camos|* Coated Glide]]<br> |
| − | {{icons|Weapon Camo}}{{icons|Wand}} * Coated Verge | + | {{icons|Weapon Camo}}{{icons|Wand}} [[Weapon Camos|* Coated Verge]] |
|} | |} | ||
| | | | ||
|- | |- | ||
| − | | {{icons|Weapon Camo}}{{rarity|13}} * Invade Destroy<br> | + | | {{icons|Weapon Camo}}{{rarity|13}} [[Weapon Camos|* Invade Destroy]]<br> |
| − | {{icons|Weapon Camo}}{{rarity|13}} * Ophistia Lightblade<br> | + | {{icons|Weapon Camo}}{{rarity|13}} [[Weapon Camos|* Ophistia Lightblade]]<br> |
| − | {{icons|Weapon Camo}}{{rarity|13}} * Zeinesis Angajima<br> | + | {{icons|Weapon Camo}}{{rarity|13}} [[* Zeinesis Angajima]]<br> |
| − | {{icons|Weapon Camo}}{{rarity|13}} * Clifard Ressentiment<br> | + | {{icons|Weapon Camo}}{{rarity|13}} [[* Clifard Ressentiment]]<br> |
| − | {{icons|Weapon Camo}}{{rarity|13}} * Trailblazer Vessel<br> | + | {{icons|Weapon Camo}}{{rarity|13}} [[Weapon Camos|* Trailblazer Vessel Creaxion]]<br> |
| − | {{icons|Weapon Camo}}{{rarity|13}} * | + | {{icons|Weapon Camo}}{{rarity|13}} [[Weapon Camos|* Latnus Finar]]<br> |
| − | {{icons|Weapon Camo}}{{rarity|13}} * | + | {{icons|Weapon Camo}}{{rarity|13}} [[Weapon Camos|* Latnus Nobire]] |
| [[Final Battle: Space-Time Interstice]] Camos | | [[Final Battle: Space-Time Interstice]] Camos | ||
|- | |- | ||
| − | | {{icons|Weapon Camo}}{{rarity|13}} * Lightweave Klauz Tail<br> | + | | {{icons|Weapon Camo}}{{rarity|13}} [[Weapon Camos|* Lightweave Klauz Tail]]<br> |
| − | {{icons|Weapon Camo}}{{rarity|13}} * Graf | + | {{icons|Weapon Camo}}{{rarity|13}} [[Weapon Camos|* Graf Steel]]<br> |
| − | {{icons|Weapon Camo}}{{rarity|13}} * Rivalate Armory<br> | + | {{icons|Weapon Camo}}{{rarity|13}} [[Weapon Camos|* Rivalate Armory]]<br> |
| − | {{icons|Weapon Camo}}{{rarity|13}} * Starquake Vessel Pleiaxion<br> | + | {{icons|Weapon Camo}}{{rarity|13}} [[Weapon Camos|* Starquake Vessel Pleiaxion]]<br> |
| − | {{icons|Weapon Camo}}{{rarity|13}} * Profound Vessel Shinxion<br> | + | {{icons|Weapon Camo}}{{rarity|13}} [[Weapon Camos|* Profound Vessel Shinxion]]<br> |
| − | {{icons|Weapon Camo}}{{rarity|13}} * Atlas Relic EX<br> | + | {{icons|Weapon Camo}}{{rarity|13}} [[Weapon Camos|* Atlas Relic EX]]<br> |
| − | {{icons|Weapon Camo}}{{rarity|13}} * Nemesis Silica<br> | + | {{icons|Weapon Camo}}{{rarity|13}} [[Weapon Camos|* Nemesis Silica]]<br> |
| − | {{icons|Weapon Camo}}{{rarity|13}} * Occuld Crypte<br> | + | {{icons|Weapon Camo}}{{rarity|13}} [[Weapon Camos|* Occuld Crypte]]<br> |
| − | {{icons|Weapon Camo}}{{rarity|13}} * Six-blade Gottsieger | + | {{icons|Weapon Camo}}{{rarity|13}} [[Weapon Camos|* Six-blade Gottsieger]] |
| | | | ||
|- | |- | ||
| Line 364: | Line 371: | ||
{{icons|Affix}} Casting V, VI<br> | {{icons|Affix}} Casting V, VI<br> | ||
{{icons|Affix}} Mastery IV, V<br> | {{icons|Affix}} Mastery IV, V<br> | ||
| − | {{ | + | {{Augs|Mutation II}}<br> |
| − | {{ | + | {{Augs|Doom Break III}}<br> |
| − | {{ | + | {{Augs|EX Alles Soul}}<br> |
| − | {{ | + | {{Augs|Exceed Energy}}<br> |
| − | {{ | + | {{Augs|Shiva Glare}}<br> |
| − | {{ | + | {{Augs|Mitra Glare}}<br> |
| − | {{ | + | {{Augs|Varuna Glare}}<br> |
| − | {{ | + | {{Augs|Origin Glare}} |
| | | | ||
|- | |- | ||
| rowspan="5" | S-Grade Augments<br>(Weapons) | | rowspan="5" | S-Grade Augments<br>(Weapons) | ||
| − | | {{ | + | | {{SGA| S1: Melee Amp}}<br> |
| − | {{ | + | {{SGA|S1: Ranged Amp}}<br> |
| − | {{ | + | {{SGA|S1: Technique Amp}}<br> |
| − | {{ | + | {{SGA|S1: Augment Will 2}}<br> |
| − | {{ | + | {{SGA|S1: Photon Balance 2}}<br> |
| − | {{ | + | {{SGA|S1: Will of the Dying}}<br> |
| − | {{ | + | {{SGA|S1: Petalgleam}}<br> |
| − | {{ | + | {{SGA|S1: Seagleam}}<br> |
| − | {{ | + | {{SGA|S1: Snowgleam}}<br> |
| − | {{ | + | {{SGA|S1: Moongleam}}<br> |
| − | {{ | + | {{SGA|S1: Leafgleam}}<br> |
| − | {{ | + | {{SGA|S1: Shadowgleam}} |
| rowspan="5" | Granted to Weapons | | rowspan="5" | Granted to Weapons | ||
|- | |- | ||
| − | | {{ | + | | {{SGA|S2: Precision Will 2}}<br> |
| − | {{ | + | {{SGA|S2: Sky-Earth Lucency 2}}<br> |
| − | {{ | + | {{SGA|S2: Timeflow Grace}}<br> |
| − | {{ | + | {{SGA|S2: Perfect Descent}}<br> |
| − | {{ | + | {{SGA|S2: Goliathslayer's Will}}<br> |
| − | {{ | + | {{SGA|S2: Rainbow Will}}<br> |
| − | {{ | + | {{SGA|S2: Rainbow Vitality}} |
|- | |- | ||
| − | | {{ | + | | {{SGA|S3: Precision Will 2}}<br> |
| − | {{ | + | {{SGA|S3: Goliathslayer's Will}}<br> |
| − | {{ | + | {{SGA|S3: Steadfast Vitality}}<br> |
| − | {{ | + | {{SGA|S3: Persistent Fury}}<br> |
| − | {{ | + | {{SGA|S3: Rainbow Descent}}<br> |
| − | {{ | + | {{SGA|S3: Lustrous Rainbow}} |
|- | |- | ||
| − | | {{ | + | | {{SGA|S4: Escalating Pursuit}}<br> |
| − | {{ | + | {{SGA|S4: Flashguard Lucent}}<br> |
| − | {{ | + | {{SGA|S4: Steely Determination}}<br> |
| − | {{ | + | {{SGA|S4: Frontal Adept}}<br> |
| − | {{ | + | {{SGA|S4: Second Whirlwind}}<br> |
| − | {{ | + | {{SGA|S4: Hammer of the Wise}}<br> |
| − | {{ | + | {{SGA|S4: Lifesteal Strike}}<br> |
| − | {{ | + | {{SGA|S4: Prolonged Blade}}<br> |
| − | {{ | + | {{SGA|S4: Transmutation Circle}}<br> |
| − | {{ | + | {{SGA|S4: Lustrous Trap}}<br> |
| − | {{ | + | {{SGA|S4: Mighty Chain}}<br> |
| − | {{ | + | {{SGA|S4: Swift Arrows Strike}}<br> |
| − | {{ | + | {{SGA|S4: Refined Providence}}<br> |
| − | {{ | + | {{SGA|S4: Sustained Cycle}}<br> |
| − | {{ | + | {{SGA|S4: Wand Impact}}<br> |
| − | {{ | + | {{SGA|S4: Support Amplification}} |
|- | |- | ||
| − | | {{ | + | | {{SGA|S5: Augment Bloom}}<br> |
| − | {{ | + | {{SGA|S5: Life V Adaptation}}<br> |
| − | {{ | + | {{SGA|S5: Finishing Blow}}<br> |
| − | {{ | + | {{SGA|S5: Provincial Provision}} |
|- | |- | ||
| rowspan="4" | S-Grade Augments<br>(Units) | | rowspan="4" | S-Grade Augments<br>(Units) | ||
|- | |- | ||
| − | | {{ | + | | {{SGA|S6: Skillful Adept}}<br> |
| − | {{ | + | {{SGA|S6: Tenacious Healscourge}}<br> |
| − | {{ | + | {{SGA|S6: Lucent Domain}}<br> |
| − | {{ | + | {{SGA|S6: Shield of Carnage}}<br> |
| − | {{ | + | {{SGA|S6: Escalating Expanse}}<br> |
| − | {{ | + | {{SGA|S6: Rainbow Shield}} |
| rowspan="4" | Granted to Units | | rowspan="4" | Granted to Units | ||
|- | |- | ||
| − | | {{ | + | | {{SGA|S7: Fortified Attack 2}}<br> |
| − | {{ | + | {{SGA|S7: Fortified Melee 2}}<br> |
| − | {{ | + | {{SGA|S7: Fortified Ranged 2}}<br> |
| − | {{ | + | {{SGA|S7: Fortified Technique 2}}<br> |
| − | {{ | + | {{SGA|S7: Concentrated Suidi}}<br> |
| − | {{ | + | {{SGA|S7: Dharma Boon}}<br> |
| − | {{ | + | {{SGA|S7: Rainbow Adept}} |
|- | |- | ||
| − | | {{ | + | | {{SGA|S8: Fortified Life Vessel 2}}<br> |
| − | {{ | + | {{SGA|S8: Fortified Photon V 2}}<br> |
| − | {{ | + | {{SGA|S8: Rainbow Erode}}<br> |
| + | {{SGA|S8: Skydance Support}} | ||
|} | |} | ||
| Line 464: | Line 472: | ||
*[https://www.youtube.com/watch?v=aHr0am0ILBw YouTube - PSO2JP - Sodam Lv.200] | *[https://www.youtube.com/watch?v=aHr0am0ILBw YouTube - PSO2JP - Sodam Lv.200] | ||
*[https://www.youtube.com/watch?v=LGTyJqmfwX8 YouTube - Lu/Lu/Lu/Et] | *[https://www.youtube.com/watch?v=LGTyJqmfwX8 YouTube - Lu/Lu/Lu/Et] | ||
| + | {{PSO2 Navbox}} | ||
| + | {{Quest NavBar}} | ||
{{PSO2 Navbox}} | {{PSO2 Navbox}} | ||
Latest revision as of 23:01, 15 July 2023
| Twisted with Hatred | |
|---|---|

| |
| Quest Type | Urgent Quests |
| Difficulty | |
| Ultra Hard | Level 200 and up |
| Quest Details | |
| Location | Armada War Zone |
| Single/Multi-Party | |
| Party Invitation | Allowed |
| Ally Assistance | Not Allowed |
| Conditions For Acceptance | |
| Ultra Hard | Possess a Super Hard Difficulty Permit |
| Restrictions | |
| Time Limit | 00:22:22 |
| Damage Limit | None |
| Ability Adjust | None |
Urgent Quest Notices
"Commencing an assault operation on Mothership Shiva. All ARKS operatives should prepare for deployment immediately."
—Initial Announcement Notice
"The assault operation on Mothership Shiva is now underway. This is the final battle. All ARKS operatives, please report to the Quest Counter for deployment."
—Announcement Notice
Quest Objective
Defeat the Primordial Darkness.
Quest Description
This is the final battle with the Primordial Darkness to put an end to this eternal war. The fate of the universe rests on it. This will be your most difficult battle yet. We pray for your victory.
This quest can be completed 1 time(s).
You will fail this quest if:
You retire after becoming incapacitated.
All party members become incapacitated.
The time limit expires.
Ranking
- This Quest has special ranking requirements. The ranking requirements are on a per-player basis.
| Defeat Enemies | 100 pts |
|---|---|
| Damage Taken | 800 pts (-1 pts for each damage taken past 10,000) |
| Quest Completion | 100 pts (No Subtraction) |
| Max Score | 1000 pts |
Enemies
| Enemy List |
|---|
Notes
- This Quest has an incapacitation limit. If the incapacitation count reaches two or higher, the Quest will automatically fail.
- This quest is only available in Ultra Hard difficulty.
Strategy
Mostly identical to the normal variation of the fight from The Face of The Abyss, with the following changes:
- Class Level required to undertake the mission is Lv.100.
- HP reduced to accommodate lower player count and time limit.
- Quest Rank Points are reduced based on damage taken
- Sodam's two initial forms have weapon weakness which are tied to each elemental form.
- Instead of four ice pillar barricades, only one ice pillar barricade will spawn during Sodam's ice stage to guard against its ultimate attacks. The spawn position of the ice pillar every time Sodam switches into the ice stage appears to be entirely random, and can be at the North, South, East or West.
- Sodam's phase after its combined element phase is appended with a brand new "elementless" phase where Sodam's attacks become greatly enhanced.
- Sodam-Gomorus fusion final phase attacks execute significantly faster.
Elementless Sodam
Elementless Sodam is the third version of the Sodam phase encountered, and grows white and black crystalline like wings. In this phase, Sodam has no weapon nor elemental weakness.
Sodam gains new attacks as well as stronger augmented versions of its ordinary attacks in this phase. Most of the attacks are avoided by constantly moving.


- Eye Barrage: Sodam rises into the air and raises its arms and stops just before doing a complete clap in a span of 4 seconds, heavily brightening the screen and immediately summons a large group of over 9 eyes that look like Maxwell Demons that fire immediate lasers to overwhelm each player with stacks of over 400 damage. This attack seems to attack every player, even players that are not Sodam's hate target but each player only sees their own set of lasers. While players are assaulted, Sodam completes the clap and summons a bunch of telegraphed pillars of light on the ground. This attack can be used at the start of Elementless Sodam's appearance, or even shortly afterwards, and as early as 2 minutes later, meaning that it will be seen twice by most players.
- Scythe of Doom: Sodam rises into the air and retreats to the north to perform an ultimate move from the background. Sodam shines brightly and grows its crystalline wings even further and raises its scythe arm over a course of 3 seconds. The field shows the whole field being telegraphed although not every area will be hit. Sodam slams its scythe arm down causing traveling shockwaves that leave aurora like trails that can deal 2142 damage to those that are unable to counter or avoid the traveling shockwaves at a distance. This attack can be used at the start of Elementless Sodam's appearance or even shortly afterwards.
- Steps of Darkness: Sodam does a slow forward strut leaving a series of four overlapping pools of darkness that deals 20 damage, drains 100 PP and staggers if stepped on. It appears that whenever Sodam's movement is stalled such as when it teleports away to do an ultimate it will also leave one of these pools of darkness, which look like safe zones of pitch black in the middle of telegraphed fields when they are not.
- Blender Laser: Sodam summons and quickly activates a cylinder made of eyes that spins around like a blender, dealing 400 damage and causing knockup if hit. Following this attack, Sodam quickly raises its left hand causing two crystalline spears from its wings to smash at the player's last location.
- Raised Hammer Cross Smash: Sodam skips the first parts of its 3 hit arm combo, raises both arms in 1.5 seconds and goes straight into the 3rd hit joined fists smash, causing a shockwave in an X shape that spreads from the point of impact to Sodam's sides, catching players attacking from its side off guard. This move can be done twice in succession after a short after delay inbetween.
- Two Swipe Combo: Sodam extends a right arm blade and swings left followed by right. This move is sometimes followed by the Three Swipe Summon Eyes Combo.
- Three Swipe Summon Eyes Combo: Sodam extends a right arm blade and swings left followed by right, then spins and swipes in a clockwise manner that can deal 600 damage. When Sodam leaps backwards after this attack it summon a series of 4 eyes that lock on to their target and fire lasers that deal 400 damage.
- Black Hole Ruptures: Sodam does its standard black hole suction move with its outstretched right arm but then summons a series of black holes in addition that explode one after another.
- Gate of Babylon: Sodam teleports to the north of the field, disappearing entirely and summons a series of 20 or so dark circles with triangles in the middle of them that look like the eye of providence that fire around 5 salvos of light arrows each, overwhelming the field, similar to Mitra's attack. The northern-most spot in front of Sodam is a safe spot, although one can just keep distance from the light arrows instead.
- Style Purge: Sodam makes a loud inhaling noise or screech and telegraphs a cylinder of 6 lasers. After firing its short range chest explosion it follows up with a burst stream of the 6 lasers. These lasting lasers rotate outwards like a fan by as much as 30 degrees in an attempt to inflict even more damage to those that did not counter the chest explosion head on. Even while the lasers are rotating outwards Sodam can go into another attack, such as the Three Swipe Summon Eyes Combo.
- Homing Explosion: As with the regular Sodam phases, a ring circle will repeatedly sound and track the player's location and will explode after a period of time, inflicting bind.
Theoretical Requirements based on a Clear Video
| Enemy | Health Ratio | Time Left at Defeat Required +-30s |
|---|---|---|
| Gommorrus | 30% | 15:40 |
| Sodam p1/p2 | 30% | 8:57 |
| Sodam p3 | 15% | 5:37 |
| Sodam-Gommorrus | 25% | 0:00 |
Drop Info
The following items can drop at the end of the Quest from breaking the crystal.
Titles
| Title Name | Requirement | Reward |
|---|---|---|
| Encounterer of the Darkness of Hatred | Clear Twisted With Hatred on Ultra Hard difficulty. | |
| Piercer of the Darkness of Hatred | Clear Twisted With Hatred on Ultra Hard difficulty with an S Rank. |
References
| |||||||||||||||||||||||||||||||||||||||||||||||
| Quests | ||
| Main Quests | Expeditions | Urgent Quests | Recommended Quests | Bonus Quests | Limited Time Quests | |
| Sub Quests | ARKS Quests | Time Attack Quests | Buster Quests | Endless Quests | Ridroid Quests Divide Quests | Advance Quests | Extreme Quests | Ultimate Quests | Challenge Quests | |
| Story Quests | EPISODE 1 | EPISODE 2 | EPISODE 3 | EPISODE 4 | EPISODE 5 | EPISODE 6 | | |
| |||||||||||||||||||||||||||||||||||||||||||||||