Difference between revisions of "Portal:New Genesis/World"
(use the damn page) |
|||
| Line 27: | Line 27: | ||
|- | |- | ||
|style="width:50%;vertical-align:top"|[[File:NGSUISectionTypeIconGathering.png|link=|right]]Gathering Area (32 Players)<br>Recommended Power Level: 800<br>Average Enemy Level: Lv.1 | |style="width:50%;vertical-align:top"|[[File:NGSUISectionTypeIconGathering.png|link=|right]]Gathering Area (32 Players)<br>Recommended Power Level: 800<br>Average Enemy Level: Lv.1 | ||
| − | |style="width:50%;vertical-align:top"|{{Template:NGSSectorStats|Ryukers=2|Cocoons=2|Towers=1|Collectables=33|Datapods=[[Portal:New_Genesis/Collectables#Datapods_.28Aelio_Region.29|9]]|Boxes=24}} | + | |style="width:50%;vertical-align:top"|{{Template:NGSSectorStats|Ryukers=2|Cocoons=2|Towers=1|Collectables=33|Datapods=[[Portal:New_Genesis/Collectables#Datapods_.28Aelio_Region.29|9]]|Boxes=[[Portal:New_Genesis/Collectables#Red_Containers_.28Aelio_Region.29|24}} |
|- | |- | ||
|colspan="2"|'''Sub-locations''': Halphana Plains, Mt. Mahinapali | |colspan="2"|'''Sub-locations''': Halphana Plains, Mt. Mahinapali | ||
| Line 43: | Line 43: | ||
|- | |- | ||
|style="width:50%;vertical-align:top"|[[File:NGSUISectionTypeIconGathering.png|link=|right]]Gathering Area (32 Players)<br>Recommended Power Level: 933<br>Average Enemy Level: Lv.7 | |style="width:50%;vertical-align:top"|[[File:NGSUISectionTypeIconGathering.png|link=|right]]Gathering Area (32 Players)<br>Recommended Power Level: 933<br>Average Enemy Level: Lv.7 | ||
| − | |style="width:50%;vertical-align:top"|{{Template:NGSSectorStats|Ryukers=3|Cocoons=2|Towers=1|Pedestals=1|Mag=1|Collectables=23|Datapods=5|Boxes=18}} | + | |style="width:50%;vertical-align:top"|{{Template:NGSSectorStats|Ryukers=3|Cocoons=2|Towers=1|Pedestals=1|Mag=1|Collectables=23|Datapods=[[Portal:New_Genesis/Collectables#Datapods_.28Aelio_Region.29|5]]|Boxes=[[Portal:New_Genesis/Collectables#Red_Containers_.28Aelio_Region.29|18}} |
|- | |- | ||
|colspan="2"|'''Sub-locations''': Aelio Town Ruins, Crykau Hills, Kanai Isle, Lakau Coast | |colspan="2"|'''Sub-locations''': Aelio Town Ruins, Crykau Hills, Kanai Isle, Lakau Coast | ||
| Line 58: | Line 58: | ||
|- | |- | ||
|style="width:50%;vertical-align:top"|[[File:NGSUISectionTypeIconGathering.png|link=|right]]Gathering Area (32 Players)<br>Recommended Power Level: 9999<br>Average Enemy Level: Lv.60 | |style="width:50%;vertical-align:top"|[[File:NGSUISectionTypeIconGathering.png|link=|right]]Gathering Area (32 Players)<br>Recommended Power Level: 9999<br>Average Enemy Level: Lv.60 | ||
| − | |style="width:50%;vertical-align:top"|{{Template:NGSSectorStats|Ryukers=1|Cocoons=1|Collectables=12|Datapods=3|Boxes=9}} | + | |style="width:50%;vertical-align:top"|{{Template:NGSSectorStats|Ryukers=1|Cocoons=1|Collectables=12|Datapods=[[Portal:New_Genesis/Collectables#Datapods_.28Aelio_Region.29|3]]|Boxes=[[Portal:New_Genesis/Collectables#Red_Containers_.28Aelio_Region.29|9}} |
|- | |- | ||
|colspan="2"|'''Sub-locations''': None | |colspan="2"|'''Sub-locations''': None | ||
| Line 72: | Line 72: | ||
|- | |- | ||
|style="width:50%;vertical-align:top"|[[File:NGSUISectionTypeIconGathering.png|link=|right]]Gathering Area (32 Players)<br>Recommended Power Level: 987<br>Average Enemy Level: Lv.10 | |style="width:50%;vertical-align:top"|[[File:NGSUISectionTypeIconGathering.png|link=|right]]Gathering Area (32 Players)<br>Recommended Power Level: 987<br>Average Enemy Level: Lv.10 | ||
| − | |style="width:50%;vertical-align:top"|{{Template:NGSSectorStats|Ryukers=2|Cocoons=1|Pedestals=1|Mag=1|Collectables=21|Datapods=6|Boxes=15}} | + | |style="width:50%;vertical-align:top"|{{Template:NGSSectorStats|Ryukers=2|Cocoons=1|Pedestals=1|Mag=1|Collectables=21|Datapods=[[Portal:New_Genesis/Collectables#Datapods_.28Aelio_Region.29|6|Boxes=[[Portal:New_Genesis/Collectables#Red_Containers_.28Aelio_Region.29|15}} |
|- | |- | ||
|colspan="2"|'''Sub-locations''': Halphana Wetlands, Altolani Plateau | |colspan="2"|'''Sub-locations''': Halphana Wetlands, Altolani Plateau | ||
| Line 89: | Line 89: | ||
|- | |- | ||
|style="width:50%;vertical-align:top"|[[File:NGSUISectionTypeIconGathering.png|link=|right]]Gathering Area (32 Players)<br>Recommended Power Level: 835<br>Average Enemy Level: Lv.3 | |style="width:50%;vertical-align:top"|[[File:NGSUISectionTypeIconGathering.png|link=|right]]Gathering Area (32 Players)<br>Recommended Power Level: 835<br>Average Enemy Level: Lv.3 | ||
| − | |style="width:50%;vertical-align:top"|{{Template:NGSSectorStats|Ryukers=1|Cocoons=2|Towers=1|Mag=1|Collectables=26|Datapods=8|Boxes=18}} | + | |style="width:50%;vertical-align:top"|{{Template:NGSSectorStats|Ryukers=1|Cocoons=2|Towers=1|Mag=1|Collectables=26|Datapods=[[Portal:New_Genesis/Collectables#Datapods_.28Aelio_Region.29|8|Boxes=[[Portal:New_Genesis/Collectables#Red_Containers_.28Aelio_Region.29|18}} |
|- | |- | ||
|colspan="2"|'''Sub-locations''': Balflow Falls, Mt. Piccolt | |colspan="2"|'''Sub-locations''': Balflow Falls, Mt. Piccolt | ||
| Line 103: | Line 103: | ||
|- | |- | ||
|style="width:50%;vertical-align:top"|[[File:NGSUISectionTypeIconCombat.png|link=|right]]Combat Area (8 Players)<br>Recommended Power Level: 864<br>Average Enemy Level: Lv.5 | |style="width:50%;vertical-align:top"|[[File:NGSUISectionTypeIconCombat.png|link=|right]]Combat Area (8 Players)<br>Recommended Power Level: 864<br>Average Enemy Level: Lv.5 | ||
| − | |style="width:50%;vertical-align:top"|{{Template:NGSSectorStats|Ryukers=1|Collectables=15|Datapods=2|Boxes=13}} | + | |style="width:50%;vertical-align:top"|{{Template:NGSSectorStats|Ryukers=1|Collectables=15|Datapods=[[Portal:New_Genesis/Collectables#Datapods_.28Aelio_Region.29|2|Boxes=[[Portal:New_Genesis/Collectables#Red_Containers_.28Aelio_Region.29|13}} |
|- | |- | ||
|colspan="2"|'''Sub-locations''': None | |colspan="2"|'''Sub-locations''': None | ||
| Line 116: | Line 116: | ||
|- | |- | ||
|style="width:50%;vertical-align:top"|[[File:NGSUISectionTypeIconCombat.png|link=|right]]Combat Area (8 Players)<br>Recommended Power Level: 1009<br>Average Enemy Level: Lv.10 | |style="width:50%;vertical-align:top"|[[File:NGSUISectionTypeIconCombat.png|link=|right]]Combat Area (8 Players)<br>Recommended Power Level: 1009<br>Average Enemy Level: Lv.10 | ||
| − | |style="width:50%;vertical-align:top"|{{Template:NGSSectorStats|Ryukers=1|Collectables=11|Datapods=3|Boxes=8}} | + | |style="width:50%;vertical-align:top"|{{Template:NGSSectorStats|Ryukers=1|Collectables=11|Datapods=[[Portal:New_Genesis/Collectables#Datapods_.28Aelio_Region.29|3|Boxes=[[Portal:New_Genesis/Collectables#Red_Containers_.28Aelio_Region.29|8}} |
|- | |- | ||
|colspan="2"|'''Sub-locations''': None | |colspan="2"|'''Sub-locations''': None | ||
| Line 131: | Line 131: | ||
|- | |- | ||
|style="width:50%;vertical-align:top"|[[File:NGSUISectionTypeIconCombat.png|link=|right]]Combat Area (8 Players)<br>Recommended Power Level: 1184<br>Average Enemy Level: Lv.15 | |style="width:50%;vertical-align:top"|[[File:NGSUISectionTypeIconCombat.png|link=|right]]Combat Area (8 Players)<br>Recommended Power Level: 1184<br>Average Enemy Level: Lv.15 | ||
| − | |style="width:50%;vertical-align:top"|{{Template:NGSSectorStats|Ryukers=1|Collectables=10|Datapods=2|Boxes=8}} | + | |style="width:50%;vertical-align:top"|{{Template:NGSSectorStats|Ryukers=1|Collectables=10|Datapods=[[Portal:New_Genesis/Collectables#Datapods_.28Aelio_Region.29|2|Boxes=[[Portal:New_Genesis/Collectables#Red_Containers_.28Aelio_Region.29|8}} |
|- | |- | ||
|colspan="2"|'''Sub-locations''': None | |colspan="2"|'''Sub-locations''': None | ||
| Line 160: | Line 160: | ||
|- | |- | ||
|style="width:50%;vertical-align:top"|[[File:NGSUISectionTypeIconGathering.png|link=|right]]Gathering Area (32 Players)<br>Recommended Power Level: 1263<br>Average Enemy Level: Lv.19 | |style="width:50%;vertical-align:top"|[[File:NGSUISectionTypeIconGathering.png|link=|right]]Gathering Area (32 Players)<br>Recommended Power Level: 1263<br>Average Enemy Level: Lv.19 | ||
| − | |style="width:50%;vertical-align:top"|{{Template:NGSSectorStats|Ryukers=2|Cocoons=1|Trigger Portals=Yellow|Collectables=35|Datapods=9|Boxes=26}} | + | |style="width:50%;vertical-align:top"|{{Template:NGSSectorStats|Ryukers=2|Cocoons=1|Trigger Portals=Yellow|Collectables=35|Datapods=[[Portal:New_Genesis/Collectables#Datapods_.28Retem_Region.29|9|Boxes=[[Portal:New_Genesis/Collectables#Red_Containers_.28Retem_Region.29|26}} |
|- | |- | ||
|colspan="2"|'''Sub-locations''': Dalshmarb Desert, Oasis, Tiarm Coast, Trinites | |colspan="2"|'''Sub-locations''': Dalshmarb Desert, Oasis, Tiarm Coast, Trinites | ||
| Line 172: | Line 172: | ||
|- | |- | ||
|style="width:50%;vertical-align:top"|[[File:NGSUISectionTypeIconGathering.png|link=|right]]Gathering Area (32 Players)<br>Recommended Power Level: 1223<br>Average Enemy Level: Lv.17 | |style="width:50%;vertical-align:top"|[[File:NGSUISectionTypeIconGathering.png|link=|right]]Gathering Area (32 Players)<br>Recommended Power Level: 1223<br>Average Enemy Level: Lv.17 | ||
| − | |style="width:50%;vertical-align:top"|{{Template:NGSSectorStats|Ryukers=3|Cocoons=1|Mag=1|Collectables=38|Datapods=6|Boxes=32}} | + | |style="width:50%;vertical-align:top"|{{Template:NGSSectorStats|Ryukers=3|Cocoons=1|Mag=1|Collectables=38|Datapods=[[Portal:New_Genesis/Collectables#Datapods_.28Retem_Region.29|6|Boxes=[[Portal:New_Genesis/Collectables#Red_Containers_.28Retem_Region.29|32}} |
|- | |- | ||
|colspan="2"|'''Sub-locations''': Sagan Mountain Road, Stechkin Lowlands | |colspan="2"|'''Sub-locations''': Sagan Mountain Road, Stechkin Lowlands | ||
| Line 184: | Line 184: | ||
|- | |- | ||
|style="width:50%;vertical-align:top"|[[File:NGSUISectionTypeIconGathering.png|link=|right]]Gathering Area (32 Players)<br>Recommended Power Level: 1396<br>Average Enemy Level: Lv.21 | |style="width:50%;vertical-align:top"|[[File:NGSUISectionTypeIconGathering.png|link=|right]]Gathering Area (32 Players)<br>Recommended Power Level: 1396<br>Average Enemy Level: Lv.21 | ||
| − | |style="width:50%;vertical-align:top"|{{Template:NGSSectorStats|Ryukers=2|Cocoons=2|Towers=1|Mag=1|Collectables=51|Datapods=8|Boxes=43}} | + | |style="width:50%;vertical-align:top"|{{Template:NGSSectorStats|Ryukers=2|Cocoons=2|Towers=1|Mag=1|Collectables=51|Datapods=[[Portal:New_Genesis/Collectables#Datapods_.28Retem_Region.29|8|Boxes=[[Portal:New_Genesis/Collectables#Red_Containers_.28Retem_Region.29|43}} |
|- | |- | ||
|colspan="2"|'''Sub-locations''': Cape Keenlad, Murabba Canyon | |colspan="2"|'''Sub-locations''': Cape Keenlad, Murabba Canyon | ||
| Line 196: | Line 196: | ||
|- | |- | ||
|style="width:50%;vertical-align:top"|[[File:NGSUISectionTypeIconGathering.png|link=|right]]Gathering Area (32 Players)<br>Recommended Power Level: 1474<br>Average Enemy Level: Lv.23 | |style="width:50%;vertical-align:top"|[[File:NGSUISectionTypeIconGathering.png|link=|right]]Gathering Area (32 Players)<br>Recommended Power Level: 1474<br>Average Enemy Level: Lv.23 | ||
| − | |style="width:50%;vertical-align:top"|{{Template:NGSSectorStats|Ryukers=2|Cocoons=2|Trigger Portals=Purple|Mag=1|Collectables=41|Datapods=9|Boxes=32}} | + | |style="width:50%;vertical-align:top"|{{Template:NGSSectorStats|Ryukers=2|Cocoons=2|Trigger Portals=Purple|Mag=1|Collectables=41|Datapods=[[Portal:New_Genesis/Collectables#Datapods_.28Retem_Region.29|9|Boxes=[[Portal:New_Genesis/Collectables#Red_Containers_.28Retem_Region.29|32}} |
|- | |- | ||
|colspan="2"|'''Sub-locations''': Aldimond Desert, Galner Coast | |colspan="2"|'''Sub-locations''': Aldimond Desert, Galner Coast | ||
| Line 208: | Line 208: | ||
|- | |- | ||
|style="width:50%;vertical-align:top"|[[File:NGSUISectionTypeIconGathering.png|link=|right]]Gathering Area (32 Players)<br>Recommended Power Level: 1513<br>Average Enemy Level: Lv.24 | |style="width:50%;vertical-align:top"|[[File:NGSUISectionTypeIconGathering.png|link=|right]]Gathering Area (32 Players)<br>Recommended Power Level: 1513<br>Average Enemy Level: Lv.24 | ||
| − | |style="width:50%;vertical-align:top"|{{Template:NGSSectorStats|Ryukers=1|Collectables=25|Datapods=2|Boxes=23}} | + | |style="width:50%;vertical-align:top"|{{Template:NGSSectorStats|Ryukers=1|Collectables=25|Datapods=[[Portal:New_Genesis/Collectables#Datapods_.28Retem_Region.29|2|Boxes=[[Portal:New_Genesis/Collectables#Red_Containers_.28Retem_Region.29|23}} |
|- | |- | ||
|colspan="2"|'''Sub-locations''': None | |colspan="2"|'''Sub-locations''': None | ||
| Line 220: | Line 220: | ||
|- | |- | ||
|style="width:50%;vertical-align:top"|[[File:NGSUISectionTypeIconCombat.png|link=|right]]Combat Area (8 Players)<br>Recommended Power Level: 1363/1633<br>Average Enemy Level: Lv.20/Lv.30 | |style="width:50%;vertical-align:top"|[[File:NGSUISectionTypeIconCombat.png|link=|right]]Combat Area (8 Players)<br>Recommended Power Level: 1363/1633<br>Average Enemy Level: Lv.20/Lv.30 | ||
| − | |style="width:50%;vertical-align:top"|{{Template:NGSSectorStats|Ryukers=1|Collectables=16|Datapods=1|Boxes=12}} | + | |style="width:50%;vertical-align:top"|{{Template:NGSSectorStats|Ryukers=1|Collectables=16|Datapods=[[Portal:New_Genesis/Collectables#Datapods_.28Retem_Region.29|1|Boxes=[[Portal:New_Genesis/Collectables#Red_Containers_.28Retem_Region.29|12}} |
|- | |- | ||
|colspan="2"|'''Sub-locations''': None | |colspan="2"|'''Sub-locations''': None | ||
| Line 232: | Line 232: | ||
|- | |- | ||
|style="width:50%;vertical-align:top"|[[File:NGSUISectionTypeIconCombat.png|link=|right]]Combat Area (8 Players)<br>Recommended Power Level: 1562/1633<br>Average Enemy Level: Lv.25/Lv.30 | |style="width:50%;vertical-align:top"|[[File:NGSUISectionTypeIconCombat.png|link=|right]]Combat Area (8 Players)<br>Recommended Power Level: 1562/1633<br>Average Enemy Level: Lv.25/Lv.30 | ||
| − | |style="width:50%;vertical-align:top"|{{Template:NGSSectorStats|Ryukers=1|Collectables=16|Datapods=3|Boxes=15}} | + | |style="width:50%;vertical-align:top"|{{Template:NGSSectorStats|Ryukers=1|Collectables=16|Datapods=[[Portal:New_Genesis/Collectables#Datapods_.28Retem_Region.29|3|Boxes=[[Portal:New_Genesis/Collectables#Red_Containers_.28Retem_Region.29|15}} |
|- | |- | ||
|colspan="2"|'''Sub-locations''': None | |colspan="2"|'''Sub-locations''': None | ||
Revision as of 11:42, 20 December 2021
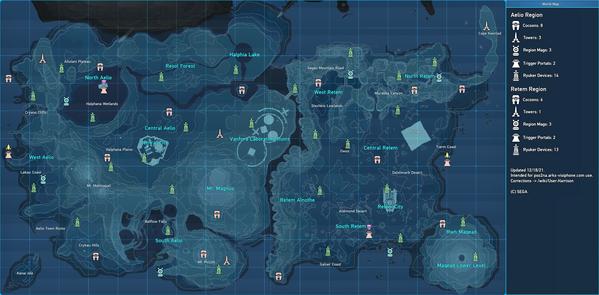
This page outlines what can be found at each location on Planet Halpha.
Regions
This section has a list of all regions on planet Halpha, and the sectors within them. Below each sector name is details about them.
Aelio
Central City
| Central City |
|---|
 |
| Lobby Area (100 Players) |
Shops and Exchanges Functions and Facilities |
The largest city on planet Halpha. This is the location you appear at when signing in, and when you return to after completing an Urgent Quest.
Central Aelio
| Central Aelio | |
|---|---|
 | |
Recommended Power Level: 800 Average Enemy Level: Lv.1 |
{{Template:NGSSectorStats|Ryukers=2|Cocoons=2|Towers=1|Collectables=33|Datapods=9|Boxes=[[Portal:New_Genesis/Collectables#Red_Containers_.28Aelio_Region.29|24}} |
| Sub-locations: Halphana Plains, Mt. Mahinapali | |
| Urgent Quests: Mining Rig Defense: Aelio | |
These are the fields found right outside of Central City's walls. With a temperate climate and easy-to-navigate terrain, this is the perfect place for new ARKS recruits to train their skills.
West Aelio
| West Aelio | |
|---|---|
 | |
Recommended Power Level: 933 Average Enemy Level: Lv.7 |
{{Template:NGSSectorStats|Ryukers=3|Cocoons=2|Towers=1|Pedestals=1|Mag=1|Collectables=23|Datapods=5|Boxes=[[Portal:New_Genesis/Collectables#Red_Containers_.28Aelio_Region.29|18}} |
| Sub-locations: Aelio Town Ruins, Crykau Hills, Kanai Isle, Lakau Coast | |
| Battledia Quests: Battledia: Yellow (Aelio Troopers) | |
A sector that makes up the western border of Aelio. Aelio Town can be found here as well as steep cliffs and beaches.
Halphia Lake
| Halphia Lake | |
|---|---|
 | |
Recommended Power Level: 9999 Average Enemy Level: Lv.60 |
{{Template:NGSSectorStats|Ryukers=1|Cocoons=1|Collectables=12|Datapods=3|Boxes=[[Portal:New_Genesis/Collectables#Red_Containers_.28Aelio_Region.29|9}} |
| Sub-locations: None | |
A lake area where enemies normally do not appear during the day.
North Aelio
| North Aelio | |
|---|---|
 | |
Recommended Power Level: 987 Average Enemy Level: Lv.10 |
{{Template:NGSSectorStats|Ryukers=2|Cocoons=1|Pedestals=1|Mag=1|Collectables=21|Datapods=[[Portal:New_Genesis/Collectables#Datapods_.28Aelio_Region.29|6|Boxes=[[Portal:New_Genesis/Collectables#Red_Containers_.28Aelio_Region.29|15}} |
| Sub-locations: Halphana Wetlands, Altolani Plateau | |
| Battledia Quests: Battledia: Purple (Aelio Devastators) | |
| Urgent Quests: Command DOLLS Suppression Op | |
The wetlands found in this region feature a derelict facility built on top of them. Further north is Altolani Plateau, where it is said a special DOLL occasionally appears.
South Aelio
| South Aelio | |
|---|---|
 | |
Recommended Power Level: 835 Average Enemy Level: Lv.3 |
{{Template:NGSSectorStats|Ryukers=1|Cocoons=2|Towers=1|Mag=1|Collectables=26|Datapods=[[Portal:New_Genesis/Collectables#Datapods_.28Aelio_Region.29|8|Boxes=[[Portal:New_Genesis/Collectables#Red_Containers_.28Aelio_Region.29|18}} |
| Sub-locations: Balflow Falls, Mt. Piccolt | |
A region well-known for its waterfalls. A coastline can also be found to the south, as well as as a mountain named Mt. Picott to the south-east.
Mt. Magnus
| Mt. Magnus | |
|---|---|
 | |
Recommended Power Level: 864 Average Enemy Level: Lv.5 |
{{Template:NGSSectorStats|Ryukers=1|Collectables=15|Datapods=[[Portal:New_Genesis/Collectables#Datapods_.28Aelio_Region.29|2|Boxes=[[Portal:New_Genesis/Collectables#Red_Containers_.28Aelio_Region.29|13}} |
| Sub-locations: None | |
Mt. Magnus is a tall mountain found to the east of Central City. Updrafters can be found scattered throughout allowing you to easily traverse the terrain.
Vanford Laboratory Ruins
| Vanford Laboratory Ruins | |
|---|---|
 | |
Recommended Power Level: 1009 Average Enemy Level: Lv.10 |
{{Template:NGSSectorStats|Ryukers=1|Collectables=11|Datapods=[[Portal:New_Genesis/Collectables#Datapods_.28Aelio_Region.29|3|Boxes=[[Portal:New_Genesis/Collectables#Red_Containers_.28Aelio_Region.29|8}} |
| Sub-locations: None | |
The Vanford Laboratory Ruins are the remains of a Laboratory attacked by DOLLS. The once tall walls have been torn down by past battles.
Defeat the Dromes found throughout this sector to convert them to your side. Once on your side, they will attack nearby enemies.
Resol Forest
| Resol Forest | |
|---|---|
 | |
Recommended Power Level: 1184 Average Enemy Level: Lv.15 |
{{Template:NGSSectorStats|Ryukers=1|Collectables=10|Datapods=[[Portal:New_Genesis/Collectables#Datapods_.28Aelio_Region.29|2|Boxes=[[Portal:New_Genesis/Collectables#Red_Containers_.28Aelio_Region.29|8}} |
| Sub-locations: None | |
| Urgent Quests: Nex Vera Suppression Op | |
Resol Forest is a forest that changes its appearance at night. It is a dangerous combat sector, with powerful enemies confirmed to appear. As such, a high Power Level is required to enter.
Retem
Retem City
| Retem City |
|---|
 |
| Lobby Area (100 Players) |
Central Retem
| Central Retem | |
|---|---|
 | |
Recommended Power Level: 1263 Average Enemy Level: Lv.19 |
{{Template:NGSSectorStats|Ryukers=2|Cocoons=1|Trigger Portals=Yellow|Collectables=35|Datapods=[[Portal:New_Genesis/Collectables#Datapods_.28Retem_Region.29|9|Boxes=[[Portal:New_Genesis/Collectables#Red_Containers_.28Retem_Region.29|26}} |
| Sub-locations: Dalshmarb Desert, Oasis, Tiarm Coast, Trinites | |
West Retem
| West Retem | |
|---|---|
 | |
Recommended Power Level: 1223 Average Enemy Level: Lv.17 |
{{Template:NGSSectorStats|Ryukers=3|Cocoons=1|Mag=1|Collectables=38|Datapods=[[Portal:New_Genesis/Collectables#Datapods_.28Retem_Region.29|6|Boxes=[[Portal:New_Genesis/Collectables#Red_Containers_.28Retem_Region.29|32}} |
| Sub-locations: Sagan Mountain Road, Stechkin Lowlands | |
North Retem
| North Retem | |
|---|---|
 | |
Recommended Power Level: 1396 Average Enemy Level: Lv.21 |
{{Template:NGSSectorStats|Ryukers=2|Cocoons=2|Towers=1|Mag=1|Collectables=51|Datapods=[[Portal:New_Genesis/Collectables#Datapods_.28Retem_Region.29|8|Boxes=[[Portal:New_Genesis/Collectables#Red_Containers_.28Retem_Region.29|43}} |
| Sub-locations: Cape Keenlad, Murabba Canyon | |
South Retem
| South Retem | |
|---|---|
 | |
Recommended Power Level: 1474 Average Enemy Level: Lv.23 |
{{Template:NGSSectorStats|Ryukers=2|Cocoons=2|Trigger Portals=Purple|Mag=1|Collectables=41|Datapods=[[Portal:New_Genesis/Collectables#Datapods_.28Retem_Region.29|9|Boxes=[[Portal:New_Genesis/Collectables#Red_Containers_.28Retem_Region.29|32}} |
| Sub-locations: Aldimond Desert, Galner Coast | |
Rwh Maqead
| Rwh Maqead | |
|---|---|
 | |
Recommended Power Level: 1513 Average Enemy Level: Lv.24 |
{{Template:NGSSectorStats|Ryukers=1|Collectables=25|Datapods=[[Portal:New_Genesis/Collectables#Datapods_.28Retem_Region.29|2|Boxes=[[Portal:New_Genesis/Collectables#Red_Containers_.28Retem_Region.29|23}} |
| Sub-locations: None | |
Retem Alnothe
| Retem Alnothe | |
|---|---|
 | |
Recommended Power Level: 1363/1633 Average Enemy Level: Lv.20/Lv.30 |
{{Template:NGSSectorStats|Ryukers=1|Collectables=16|Datapods=[[Portal:New_Genesis/Collectables#Datapods_.28Retem_Region.29|1|Boxes=[[Portal:New_Genesis/Collectables#Red_Containers_.28Retem_Region.29|12}} |
| Sub-locations: None | |
Maqead Lower Level
| Maqead Lower Level | |
|---|---|
 | |
Recommended Power Level: 1562/1633 Average Enemy Level: Lv.25/Lv.30 |
{{Template:NGSSectorStats|Ryukers=1|Collectables=16|Datapods=[[Portal:New_Genesis/Collectables#Datapods_.28Retem_Region.29|3|Boxes=[[Portal:New_Genesis/Collectables#Red_Containers_.28Retem_Region.29|15}} |
| Sub-locations: None | |
Ryuker Devices
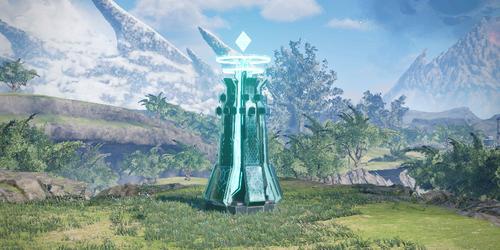
Ryuker Devices, represented on the World Map as green icons (![]() ), can be used for several purposes, including changing Blocks, accessing your Storage remotely, creating Quick Food, and moving to different Rooms.
), can be used for several purposes, including changing Blocks, accessing your Storage remotely, creating Quick Food, and moving to different Rooms.
Ryuker Devices can also be used for quick travel via teleportation. By interacting with a Ryuker Device, or by opening your World Map, you can teleport to any other known Ryuker Device. Highlight the icon for the Ryuker Device you want to teleport to, then hold the confirm button down for a few seconds to start the teleport.
Item Containers
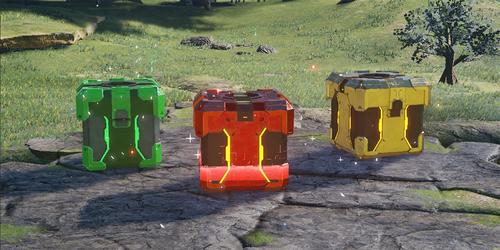
There are three types of Item Containers in the field: Green, Red, and Gold. Attack Item Containers to break them and reveal the items.
Green Containers contain N-Grinders, and Gold Containers contain Photon Quartz.
Red Containers can contain either ![]() 10,000,
10,000, ![]() 10, or Note Augments. Certain Red Containers contain exclusive items, like the Qual De Armor: Arga, Qual De Armor: Belta, and Qual De Armor: Sheza.
10, or Note Augments. Certain Red Containers contain exclusive items, like the Qual De Armor: Arga, Qual De Armor: Belta, and Qual De Armor: Sheza.
The number of red containers that appear per account is limited. In addition, some barriers are created around the Red Container and the container cannot be destroyed without destroying the devices that are creating the barrier.
For a list of all Red Containers and collectables, please visit this page.
Region Mags
Region Mags are facilities that looks like an enormous Mag.
Putting gathering materials inside of it can grant a boost effect that other ARKS members can share.
| ||||||||||||||||||||||||||||||||||||||||||||||||||


